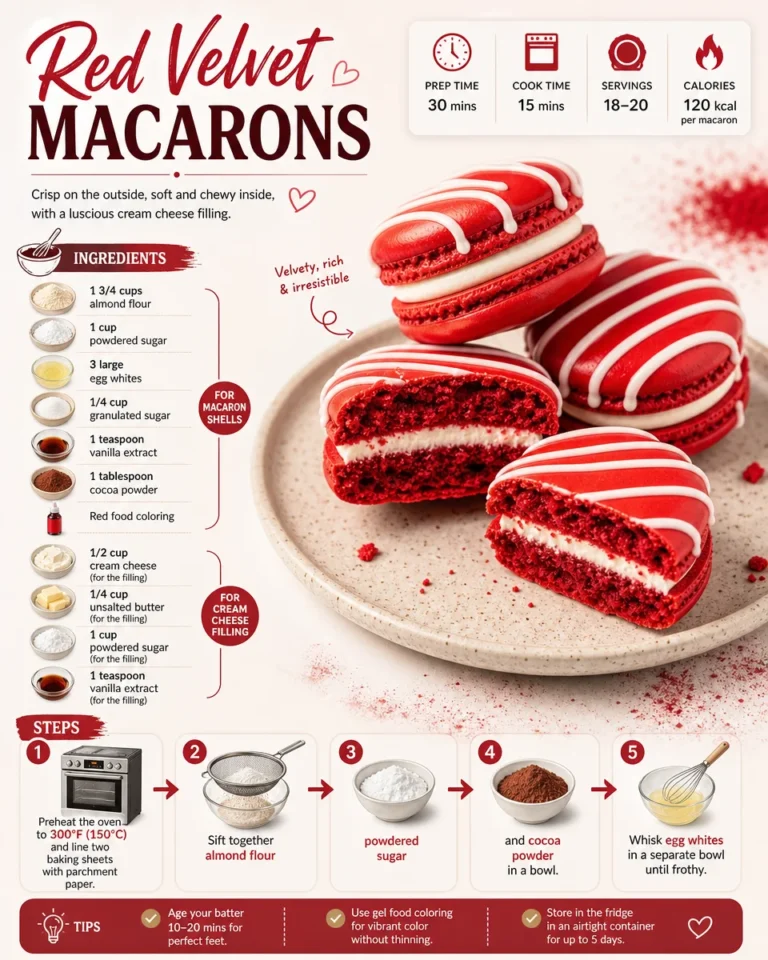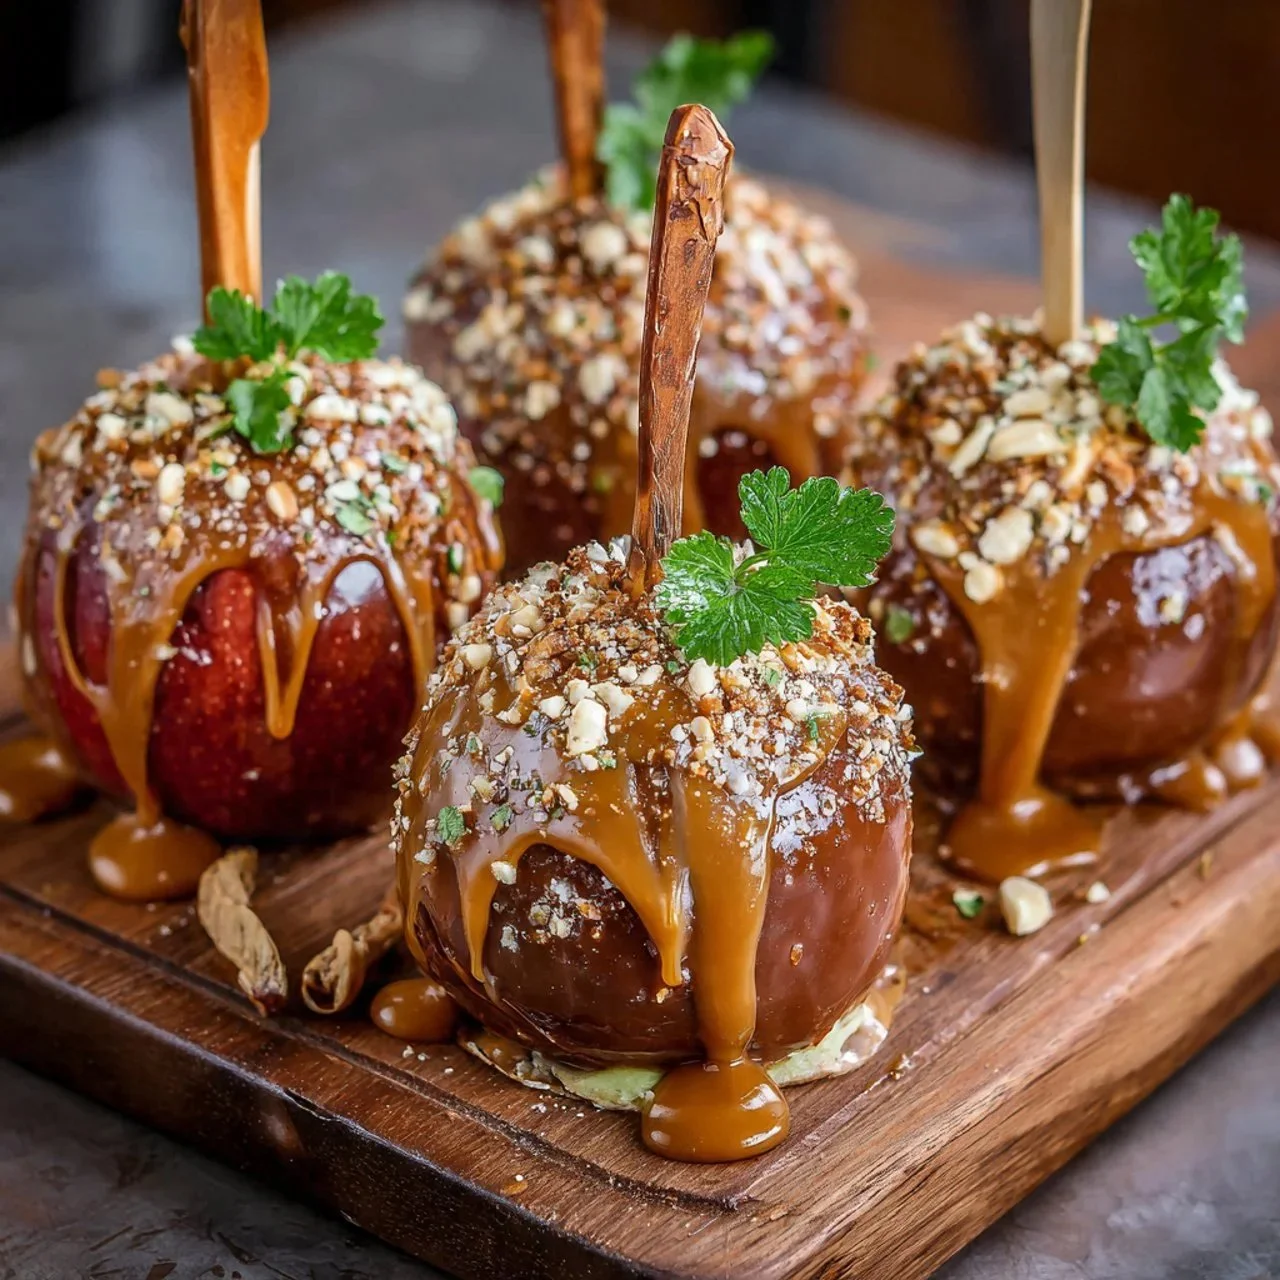
Peanut Butter Caramel Apple Pops
The Delicious Discovery of Peanut Butter Caramel Apple Pops Just the other day, as the crisp autumn air started to fill my kitchen, I found myself craving something both sweet and a tad indulgent. The fall season always makes me think of apples, and I can’t help but reminisce about the apple-picking adventures I used…
The Delicious Discovery of Peanut Butter Caramel Apple Pops
Just the other day, as the crisp autumn air started to fill my kitchen, I found myself craving something both sweet and a tad indulgent. The fall season always makes me think of apples, and I can’t help but reminisce about the apple-picking adventures I used to have as a child. That’s when it hit me: I hadn’t made my favorite treat, Peanut Butter Caramel Apple Pops, in a while.
This delightful dessert is an incredible combination of fresh apples dipped in a creamy peanut butter caramel. It’s the perfect blend of crunchy, sweet, and nutty flavors that is sure to please anyone. With just a few ingredients, you’ll have a dessert that not only looks fabulous but tastes divine.
What You’ll Need for These Treats
To get started, let’s talk about the star of the show: the apples. For my Peanut Butter Caramel Apple Pops, I always reach for large, crisp apples like Pink Lady, Honeycrisp, or Granny Smith. Their tartness balances beautifully with the sweet caramel.
You’ll want to gather 5 tablespoons of coconut oil, 4 tablespoons of pure maple syrup for sweetness, and just a touch of vanilla extract (1/2 teaspoon) for that extra layer of flavor. A pinch of salt is essential, as it enhances the sweetness of the caramel, and of course, you can’t forget the creamy peanut butter (6 tablespoons)!
To get that just-right consistency, I find that 1/4 cup of plant milk—like oat milk—works wonderfully to thin out the mixture. Finally, sprinkle on some chopped nuts like peanuts or pecans for that perfect crunch at the end.
The Magic of Preparation
First things first, wash and dry your apples thoroughly. There’s nothing worse than biting into a sweet delight only to be met with leftover dirt! Once that’s taken care of, core the apples and insert wooden sticks into the tops. This step makes them easier to handle, especially for kids (or adults who can’t resist a little childhood nostalgia!).
While preparing the apples, I usually get my cozy factor going by melting the coconut oil in a small saucepan over low heat. It starts to fill the kitchen with a lovely aroma. As it melts, add in the maple syrup and vanilla extract, then stir in a pinch of salt. Watching the ingredients come together into a glistening syrup is simply satisfying.
Now, here’s where the magic really happens. As soon as everything is well combined, whisk in the creamy peanut butter until it transforms into a luscious caramel. If it’s too thick, don’t hesitate to add a splash of oat milk until you achieve that gooey goodness.
Time for Dipping
Now that your apples are prepped and the caramel is at the perfect consistency, it’s time for the fun part: dipping. Hold each apple above the saucepan and plunge it into the warm peanut butter caramel, making sure it’s well-coated. Allow any excess caramel to drip off before placing them on a parchment-lined baking sheet. This part is not only fun but kind of mesmerizing. Just imagine the shiny, decadent coating forming around the apple.
Before the caramel sets—don’t let it cool too much!—I love to sprinkle on the chopped nuts, which add that satisfying crunch. The contrast of textures is one of the best things about this dessert.
Set and Enjoy
After you’ve coated all your apples and added your toppings, place the baking sheet in the refrigerator for at least 30 minutes. This cooling step is vital because it lets the caramel set up nicely, turning it into that dreamy layer we all crave.
When you take them out, you’ll see those apples looking glossy and inviting. The anticipation builds as you bite into the crisp fruit underneath that rich caramel coating—it’s pure bliss.
Variations to Try
What I love about this recipe is how customizable it can be. If you want to switch things up, why not try using different kinds of nut butters? Almond butter for a richer flavor or even sun butter if you need a nut-free option could be fun!
Also, consider drizzling a bit of melted dark chocolate over the top for an extra touch of indulgence. Oh, and for those who like a little spice, a sprinkle of cinnamon inside the peanut butter caramel can bring out a cozy warmth in every bite.
The Best Part About Making Them
What I adore most about Peanut Butter Caramel Apple Pops is how easy they are to prepare. Even on a busy weeknight, you can whip up a batch without too much fuss. The kids can join in, making it a fun family activity. Plus, you can make them ahead of time and keep them in the fridge, ready for when that sweet tooth hits.
When it comes to leftovers (if there ever are any!), I usually recommend wrapping them individually in plastic wrap to keep the caramel from getting sticky. Stored properly, they last a couple of days, though let’s be honest, they rarely stick around that long!
Why This Recipe Holds a Special Place
Every time I make these Peanut Butter Caramel Apple Pops, I’m reminded of those crisp fall days spent apple-picking. The smell of fresh apples and sweet caramel cooking away takes me back to simpler times, filled with laughter and joy. It’s more than just a recipe—it’s a celebration of memories and flavors that bring people together.
So next time you’re in the mood for something sweet yet healthy, give this recipe a try. I promise it’s worth the little bit of effort for the big smiles you’ll get in return.
Conclusion
If you’re looking to make your own batch of delicious Peanut Butter Caramel Apple Pops, it’s super easy to follow this delightful recipe. You can explore even more related recipes, like this Peanut Butter Caramel Apple Pops from Healthy Little Vittles for different variations. You can find more creative ideas, like the PB Caramel Apple Pop on Dave’s Fresh Marketplace Recipes.
These treats not only satisfy your sweet cravings but also create cherished memories that you and your loved ones will treasure for years. So grab some apples and get to dipping!

Peanut Butter Caramel Apple Pops
Ingredients
Method
- Wash and dry the apples thoroughly. Core the apples and insert wooden sticks into the tops.
- Melt the coconut oil in a small saucepan over low heat.
- Add in the maple syrup and vanilla extract, and stir in a pinch of salt.
- Whisk in the creamy peanut butter until the mixture transforms into a luscious caramel. Adjust consistency with oat milk as necessary.
- Hold each apple above the saucepan and plunge it into the warm caramel, ensuring it’s well-coated.
- Allow excess caramel to drip off before placing them on a parchment-lined baking sheet.
- Before the caramel sets, sprinkle the chopped nuts on top.
- Place the baking sheet in the refrigerator for at least 30 minutes to allow the caramel to set.
- Serve and enjoy the glossy, inviting Peanut Butter Caramel Apple Pops.