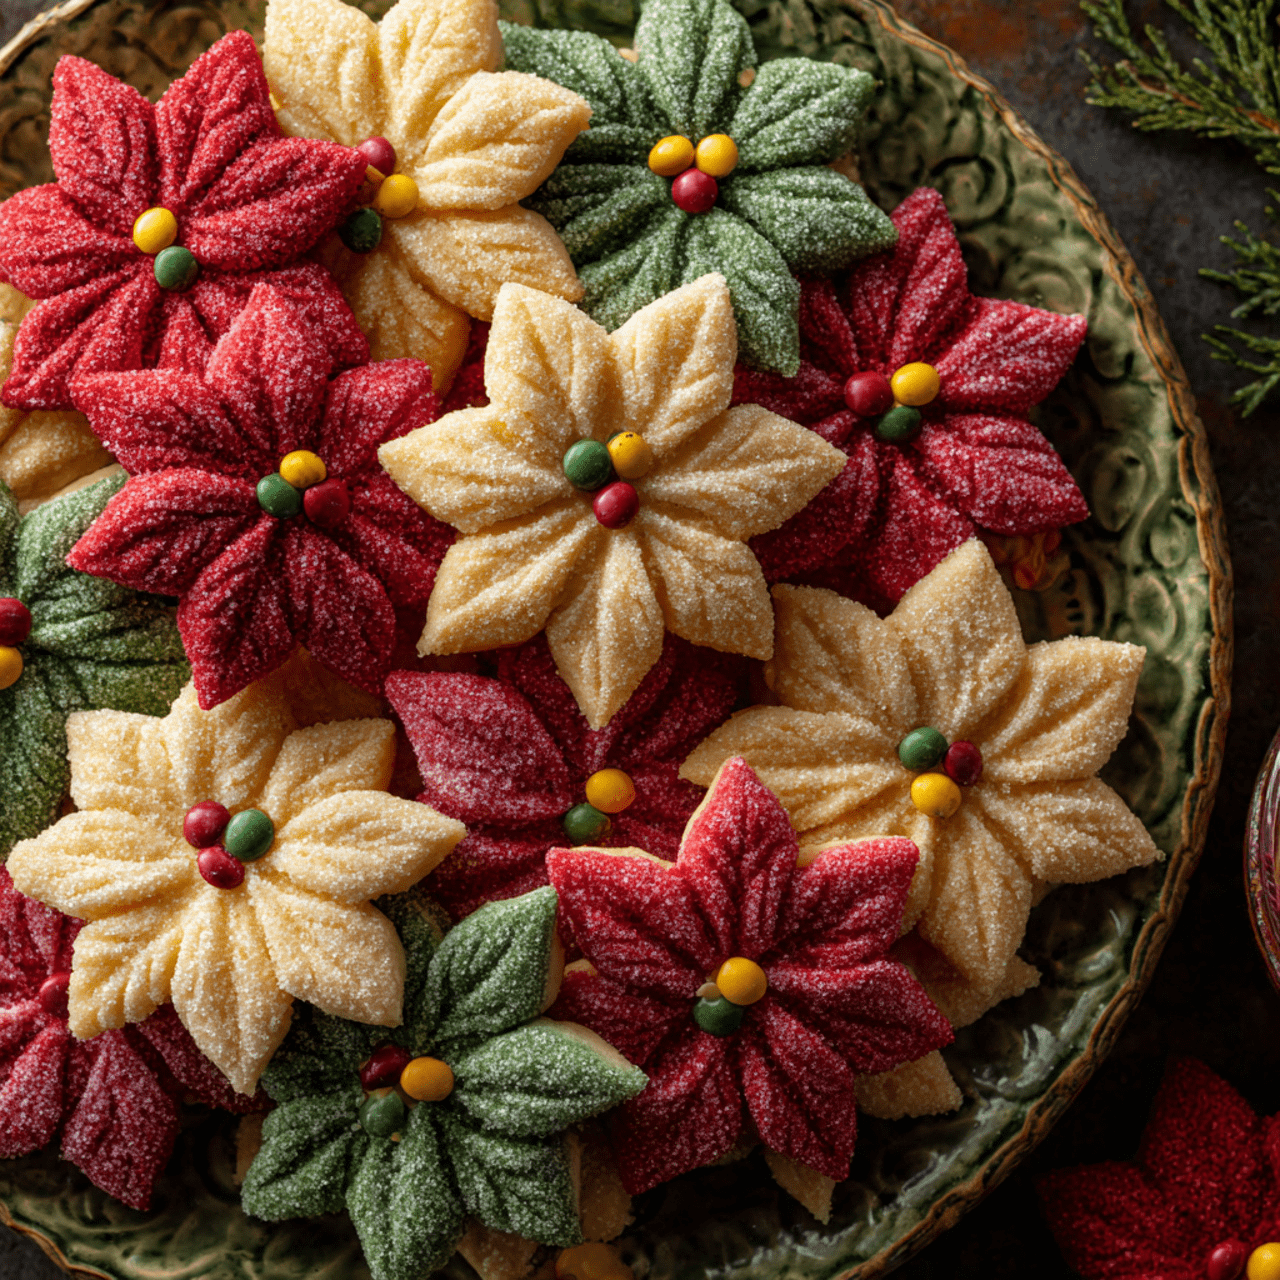
Stunning Poinsettia Pinwheel Cookies (The Ultimate Cookie Recipe!)
If you are looking for the absolute star of your holiday baking lineup, look no further. These Poinsettia Pinwheel Cookies are not just treats; they are edible ornaments that capture the very spirit of the season. When it comes to Christmas cookies recipes, we often see the same gingerbread men and sugar cutouts, but these…
If you are looking for the absolute star of your holiday baking lineup, look no further. These Poinsettia Pinwheel Cookies are not just treats; they are edible ornaments that capture the very spirit of the season. When it comes to Christmas cookies recipes, we often see the same gingerbread men and sugar cutouts, but these vibrant, flower-shaped pastries offer something truly spectacular and unique.
I promise you, placing a platter of these glistening red and white poinsettias on your holiday table is a moment of pure pride. The buttery, flaky layers melt in your mouth, and the crunch of the sanding sugar adds the perfect festive finish. They are elegant, whimsical, and guaranteed to be the cookie everyone talks about this year.
Get ready to master a dough that is a dream to work with and create the most beautiful cookies of the season.

Why These Poinsettias Are the Queen of Christmas Cookies!
You are going to be completely obsessed with the bakery-quality finish of these homemade treats. They are a holiday must-bake for so many reasons:
- A Visual Show-Stopper: The pinwheel shape combined with the vibrant red, white, and green sanding sugars makes these look incredibly professional and festive.
- Rich Cream Cheese Dough: This isn’t a dry biscuit. The cream cheese and butter base creates a tender, flaky, pastry-like texture that is incredibly indulgent.
- No Icing Skills Required: Unlike many intricate Christmas cookies, you don’t need to know how to flood royal icing. The sanding sugar does all the decorating before they even hit the oven.
- Fun to Assemble: The folding technique is surprisingly simple once you get the hang of it, making this a fun project for a cozy afternoon.
- Perfect for Gifting: Because they are sturdy and beautiful, they pack wonderfully into tins for the ultimate homemade holiday gift.
Recipe Snapshot
| Active Prep Time | 55 minutes |
| Chill Time | 3 hours (approx) |
| Cook Time | 25 minutes |
| Total Time | 4 hours 30 minutes |
| Servings | 18 cookies |
| Calories | 475 kcal per cookie |
| Course | Dessert, Cookies |
| Cuisine | American / Holiday |
| Difficulty/Method | Intermediate / Baking |
Your Shopping List for Holiday Baking
This recipe relies on high-fat staples to create that tender pastry dough. Here is what you need:

→ For the Pastry Dough
- 8-ounce package cream cheese → Must be at room temperature to blend smoothly without lumps.
- 2 sticks (1 cup) unsalted butter → Also at room temperature. This provides the rich, flaky layers.
- 3 tablespoons granulated sugar → The dough itself isn’t overly sweet, allowing the sanding sugar to shine.
- 2 ¾ cups all-purpose flour → The structure of the cookie.
- ½ teaspoon fine salt → Essential to balance the richness of the butter and cream cheese.
→ For the Decoration
- Coarse sanding sugars → You will need Red, White, and Green to create the poinsettia look.
- 18 to 20 yellow candy-coated chocolates → Like yellow M&Ms, for the flower centers.
- Water → For brushing the dough so the sugar sticks.
Let’s Bake! Crafting Your Poinsettias Step-by-Step
Ready to create edible art? This process takes a little patience with chilling, but the assembly is pure fun.
Part 1: Make the Cream Cheese Dough
- Cream the Fats: In a large bowl using an electric mixer, beat the room temperature cream cheese, butter, and granulated sugar on medium-high speed. Beat for about 2 minutes until the mixture is light, fluffy, and completely smooth. Scrape down the bowl as needed.
- Add Dry Ingredients: Reduce the mixer speed to low. Gradually beat in the flour and salt just until combined. The dough will be soft.
- Chill: Divide the dough into two equal halves. Flatten each half into a ½-inch thick disk and wrap tightly in plastic wrap. Refrigerate for at least 1 hour (or up to overnight) until the dough is firm enough to roll out.
Part 2: Cut and Shape the Pinwheels
- Prep: Preheat your oven to 350°F. Line two baking sheets with parchment paper.
- Roll: Working with one disk at a time (keep the other in the fridge), roll the dough out on a lightly floured surface until it is about ⅛-inch thick. Use flour as needed to prevent sticking.
- Cut Squares: Using a sharp knife or a square cutter, cut out 3-inch squares. You should get about 6 or 7 squares per disk. Carefully transfer these squares to your prepared baking sheet, spacing them 2 inches apart. Gather scraps and refrigerate them.
- Cut Slits: Use a paring knife to cut a 1 ½-inch slit from each of the four corners toward the center of the square. Do not cut all the way through the center; leave a solid spot in the middle.
- Fold: To form the pinwheel, take every other point (one side of each slit) and fold it into the center, pressing down gently to adhere it to the middle. Place the formed flowers in the fridge while you make the leaves.

Part 3: Decorate and Assemble
- Make Leaves: Roll out your chilled dough scraps. Cut out leaf shapes using a knife or a leaf cutter. You need 2 leaves for each flower. Place leaves on the second baking sheet. Brush them lightly with water and sprinkle generously with green sanding sugar.
- Color the Flowers: Remove the pinwheels from the fridge. Brush them lightly with water. Sprinkle half of them with red sanding sugar and the other half with white sanding sugar.
- Final Assembly: Carefully tuck the ends of 2 green leaves underneath each pinwheel on opposite sides. The dough will meld together as it bakes, so you don’t need to press too hard.
Part 4: Bake and Center
- Bake: Bake the cookies for 20 to 25 minutes, rotating the pan halfway through. You want them puffed and the edges just turning golden.
- The Center: Immediately upon removing the pan from the oven, press a yellow candy-coated chocolate firmly into the center of each hot cookie. This sets the candy and helps seal the pinwheel folds.
- Cool: Let them cool on the baking sheet for 5 minutes, then transfer to a wire rack to cool completely. Repeat with the second disk of dough.
Poinsettia Pinwheel Cookies
Ingredients
Equipment
Method
- Beat the cream cheese, butter, and granulated sugar in a large bowl with an electric mixer on medium-high speed until light and fluffy, about 2 minutes.
- Reduce speed to low; beat in flour and salt until combined. Divide dough in half, flatten into disks, wrap in plastic, and refrigerate until firm (at least 1 hour).
- Preheat oven to 350°F. Line 2 baking sheets with parchment. Roll out one disk of dough on a floured surface to 1/8-inch thick.
- Cut out 3-inch squares. Transfer to baking sheet. Save scraps. Cut a 1 1/2-inch slit from each corner toward the center of each square.
- Fold every other point into the center and press gently to form a pinwheel. Refrigerate the pinwheels.
- Cut leaf shapes from the dough scraps. Brush leaves with water and coat with green sanding sugar.
- Brush pinwheels with water. Sprinkle half with red sugar and half with white sugar. Tuck two green leaves under each pinwheel.
- Bake for 20 to 25 minutes until puffed and edges are golden.
- Immediately press a yellow chocolate candy into the center of each warm cookie. Cool on pan for 5 minutes, then transfer to a rack.
Notes
WiseRecipes’ Top Tips for Cookie Perfection
These cookies require a little finesse, but these tips will ensure they look professional.
- Keep the Dough Cold. This is the golden rule of pastry-style cookies. If the dough gets warm, it will be sticky and hard to cut. If it softens while you are working, pop it back in the fridge for 10 minutes.
- Spoon and Level the Flour. As the recipe note mentions, do not scoop flour directly with the measuring cup, or you will pack it down. Spoon flour into the cup and level it off. Too much flour makes the cookies dry and tough.
- Press the Centers Firmly. When folding the pinwheel points into the center, give them a good press. If they aren’t secured, they can pop open in the oven. Pressing the M&M in immediately after baking helps lock everything in place.
- Use an Offset Spatula. The cut dough squares can be delicate. An offset spatula is the best tool for lifting them from your work surface to the baking sheet without stretching them out of shape.
- Don’t Overbake. You want the edges to be lightly golden, but the cookie should remain pale enough that the colored sugar pops. If they get too brown, they lose their delicate, festive look.
Keep Them Fresh! Storing Your Holiday Cookies
These cookies store beautifully, making them excellent for holiday preparation.
- Storage: Store the cooled cookies in a single layer (or layered with parchment paper) in an airtight container at room temperature. They will stay fresh for up to 3 days.
- Freezing Dough: You can freeze the disks of dough for up to 1 month. Thaw in the refrigerator overnight before rolling.
- Freezing Baked Cookies: While best fresh, you can freeze the baked cookies without the candy center for up to a month. The sugar may dissolve slightly upon thawing, so they are prettiest when fresh.
FAQs: Your Poinsettia Cookie Questions, Answered!
Why did my pinwheels open up in the oven?
This usually happens if the dough points weren’t pressed into the center firmly enough, or if the dough was too warm when it went into the oven. Ensure the shaped cookies are cold before baking to help them hold their shape.
Can I use a different dough?
This specific cream cheese dough is designed to puff and hold the pinwheel shape. A standard sugar cookie dough might spread too much, causing the flower definition to be lost. I recommend sticking to this pastry-style dough for the best results.
Can I use jam in the center instead of chocolate?
Yes! If you prefer a fruit center, you can place a small dollop of thick jam (like raspberry or apricot) in the center before baking. Just be careful not to overfill, or it will spill out.
Do I have to use sanding sugar?
Sanding sugar gives the best sparkle and crunch, but you can use regular granulated sugar mixed with food coloring if you can’t find coarse sugar. The visual effect will be slightly different but still festive.
Final Thoughts: A Masterpiece for Your Table
There is something deeply satisfying about creating a cookie that looks like a piece of art. These Poinsettia Pinwheel Cookies are a celebration of the season—vibrant, flaky, and utterly delicious. They take a little extra time, but the smiles they bring are worth every second. I hope these beautiful blooms become a cherished part of your Christmas cookies recipes collection. Happy baking!