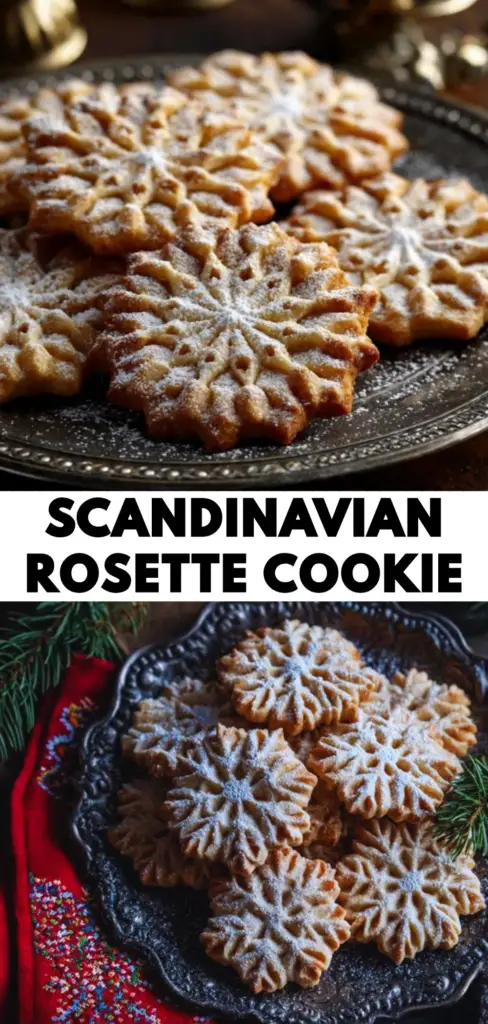
The Ultimate Rosette Cookies (Decorated Christmas Cookies!)
Imagine the most delicate, crispy, snowflake-like cookie, deep-fried to a perfect golden-brown, shattering in your mouth with a light, airy crunch, and finished with a sweet, snowy dusting of powdered sugar or a delicate dip in glaze. That, my friends, is the traditional, beautiful, and utterly enchanting magic of Scandinavian Rosette Cookies. This is, without…
Imagine the most delicate, crispy, snowflake-like cookie, deep-fried to a perfect golden-brown, shattering in your mouth with a light, airy crunch, and finished with a sweet, snowy dusting of powdered sugar or a delicate dip in glaze. That, my friends, is the traditional, beautiful, and utterly enchanting magic of Scandinavian Rosette Cookies. This is, without a doubt, the most unique and impressive fried cookie you will add to your Christmas baking traditions.
I promise you, there is no greater holiday baking delight than watching the batter magically transform into a delicate, lacy cookie the moment it hits the hot oil. The cookies themselves are not overly sweet, which makes them the perfect canvas for a simple glaze or a generous dusting of powdered sugar. They are a true show-stopper on any holiday platter.
Get ready to discover a new holiday favorite, a recipe that brings a touch of old-world Scandinavian charm to your Christmas celebration and creates a cookie that is as beautiful as it is delicious.
Why Rosettes Will Be Your New Holiday Tradition
You are going to fall in love with this unique and beautiful cookie-making process. It’s a truly special holiday activity. Here’s why:
- Stunningly Delicate and Beautiful: With their intricate, snowflake-like patterns, rosettes are some of the most beautiful and elegant cookies you can make for the holidays.
- Incredibly Light and Crispy Texture: These are not your average cookies! They are ultra-thin, airy, and shatter with the most satisfyingly delicate crunch.
- A Fun and Fascinating Process: Using a traditional rosette iron to fry these cookies is a unique and rewarding experience that feels like a little bit of holiday magic.
Recipe Snapshot
| Prep Time | 20 minutes |
| Cook Time | 30 minutes |
| Total Time | 50 minutes |
| Servings | 48 cookies (4 dozen) |
| Calories | 50 kcal per cookie (with icing) |
| Course | Dessert |
| Cuisine | Scandinavian |
| Difficulty/Method | Intermediate / Frying |
Your Shopping List for These Crispy Delights
This traditional fried cookie comes together with just a handful of simple pantry staples.
→ For the Rosette Cookies
- 2 large eggs → At room temperature.
- 2 teaspoons sugar → Just a touch of sweetness in the batter itself.
- 1 cup 2% milk → You can also use whole milk.
- 3 teaspoons vanilla extract → Divided for the batter and the icing.
- 1 ¼ cups all-purpose flour → Spooned and leveled.
- ¼ teaspoon salt → To balance the flavors.
- Oil for deep-frying → A neutral oil with a high smoke point, like canola, vegetable, or peanut oil.
→ For the Simple Icing (Optional)
- 2 cups confectioners’ sugar
- 1 to 3 tablespoons water
Let’s Get Frying! Your Step-by-Step Rosette Guide
Ready to try your hand at this beautiful Scandinavian tradition? Let’s get the oil ready!
Part 1: The Thin Rosette Batter
- Combine Wet Ingredients: In a small bowl, lightly beat the eggs and sugar. Stir in the milk and 2 teaspoons of the vanilla extract.
- Finish the Batter: In a separate, larger bowl, whisk together the flour and salt. Gradually pour the wet ingredients into the dry ingredients, whisking until you have a smooth, thin batter, about the consistency of heavy cream. Let the batter rest for a few minutes.
Part 2: The Magic of Frying
- Heat the Oil and Iron: In a deep-fat fryer or a deep, heavy-bottomed pot, heat about 2 ½ inches of oil to 375°F. This temperature is important! Submerge your rosette iron in the hot oil for about 1-2 minutes to get it very hot.
- Dip in Batter: Carefully lift the hot iron out of the oil, letting the excess drip off. Immediately dip the hot iron into the batter. The batter should sizzle. Submerge it only about three-fourths of the way up the sides of the iron—do NOT let the batter go over the top!
- Fry the Rosette: Immediately plunge the batter-coated iron back into the hot oil. The rosette should release from the iron after a few seconds. If it doesn’t, use a fork to gently nudge it off.
- Fry Until Golden: Fry the floating rosette for 1-2 minutes per side, until it’s a beautiful, even golden brown. Use tongs or a slotted spoon to carefully remove it from the oil and place it on a wire rack lined with paper towels to drain and cool.
- Repeat: Remember to heat the iron in the oil for a moment before each and every cookie. Continue the process with the remaining batter.
Part 3: Decorate and Serve
- Make the Icing: While the rosettes cool, whisk together the confectioners’ sugar, 1 teaspoon of vanilla, and just enough water to create a smooth icing with a good dipping consistency.
- Decorate: Once the rosettes are completely cool, you can dip the delicate edges into the icing. Place them back on the wire racks to let the icing set completely. Alternatively, you can simply dust them with powdered sugar. Serve and enjoy their incredible crunch!
Traditional Scandinavian Rosette Cookies
Ingredients
Equipment
Method
- In a small bowl, beat eggs and sugar. Stir in milk and 2 teaspoons of vanilla. In a separate bowl, combine flour and salt. Gradually whisk the wet ingredients into the dry until the batter is smooth.
- In a deep pot, heat 2 1/2 inches of oil to 375°F. Place the rosette iron in the hot oil for 1-2 minutes to heat it thoroughly.
- Lift the hot iron from the oil, let excess drip off, then dip it into the batter, submerging it only three-fourths of the way up the sides of the iron.
- Immediately place the batter-coated iron into the hot oil. The rosette should release from the iron after a few seconds; use a fork to gently loosen it if needed.
- Fry the rosettes, a few at a time, until golden brown, about 1-2 minutes on each side. Remove to a wire rack lined with paper towels to drain. Remember to reheat the iron in the oil before making each new cookie.
- For the optional icing, combine the confectioners’ sugar, 1 teaspoon vanilla, and enough water to achieve a dipping consistency.
- Once cool, dip the edges of the rosettes into the icing and let them dry on wire racks. Alternatively, dust with powdered sugar.
Notes
WiseRecipes’ Top Tips for Perfect Rosettes
This traditional cookie is all about temperature and technique. These tips will help you succeed.
- Oil Temperature is Everything. A deep-fry thermometer is your best friend here. If the oil is too cold, the rosettes will be greasy. If it’s too hot, they will burn before they can become crispy. 375°F is the sweet spot.
- A Hot Iron is the Secret. The iron must be fully heated in the oil before you dip it in the batter. It’s the heat of the iron that makes the batter adhere to it. Remember to re-heat the iron for a few seconds between each cookie.
- Don’t Over-Dip! This is the most common mistake. If you let the batter go over the top of the iron, the cookie will be trapped and won’t release into the oil. Only dip it about three-quarters of the way up.
- Batter Consistency Matters. The batter should be quite thin, similar to heavy cream or a thin pancake batter. If it’s too thick, the rosettes will be heavy and doughy instead of light and crisp.
- Drain and Cool Properly. Let the freshly fried rosettes drain on paper towels set over a wire rack. This allows air to circulate and excess oil to drip away, ensuring a perfectly crispy cookie.
Keep Them Fresh! Storing Your Crispy Cookies
Un-iced rosettes have an excellent shelf life, making them a great make-ahead holiday cookie.
- Storage: Once completely cool, store the plain, un-iced rosettes in an airtight container at room temperature. They are very fragile, so handle them with care! They will stay crisp for up to two weeks. It’s best to ice or dust them with sugar just before serving.
FAQs: Your Rosette Questions, Answered!
Where can I find a rosette iron?
Rosette iron sets are often considered a vintage item, but they are still widely available online! You can find them on Amazon or at specialty kitchenware stores, especially around the holidays. Many sets come with multiple, interchangeable festive shapes.
My batter isn’t sticking to the iron. What’s wrong?
This almost always means your iron is not hot enough. Make sure you are submerging the iron in the 375°F oil for at least a minute before the very first cookie, and for at least 15-20 seconds between each subsequent cookie to bring it back up to temperature.
My rosettes are coming out greasy. How can I fix this?
Greasy rosettes are a sign that your oil temperature is too low. The batter is absorbing oil instead of quickly crisping up in it. Turn up the heat slightly and use your thermometer to make sure you’re maintaining a steady 375°F.
Can I flavor the batter?
Yes! While vanilla is classic, you could add a little almond extract, or some finely grated lemon or orange zest to the batter for a different flavor profile. A pinch of cardamom is also a very traditional and delicious addition.
Final Thoughts: A Taste of Scandinavian Christmas Magic
There is something truly magical about watching these delicate, lacy cookies form in the hot oil. Rosettes are a beautiful and delicious link to holiday traditions of the past. They are a rewarding project that results in a uniquely light, crisp, and stunning cookie that is sure to enchant your family and friends. I hope this recipe brings a touch of old-world charm and crispy delight to your Christmas celebration. God Jul!