My Ultimate Salted Caramel Drip Cake (A Show-Stopping Masterpiece!)
Oh, my friends, prepare yourselves for a dessert that is nothing short of pure, unadulterated decadence! If you’ve been dreaming of a cake that not only tastes absolutely incredible but also looks like it stepped right off the pages of a gourmet magazine, then today at WiseRecipes, I’m beyond thrilled to share my recipe for…
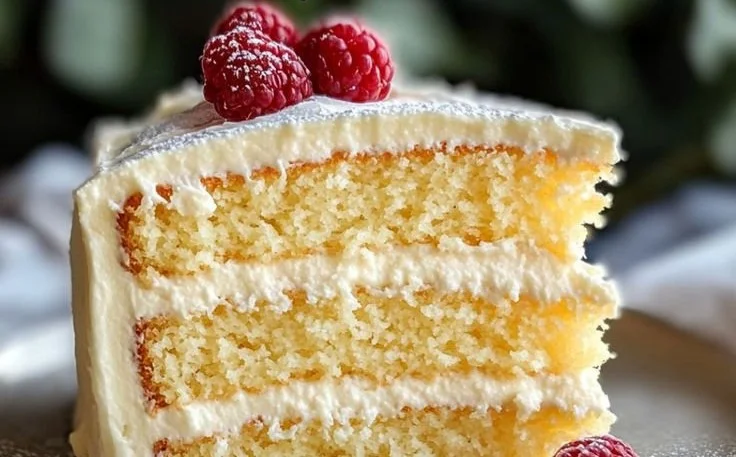
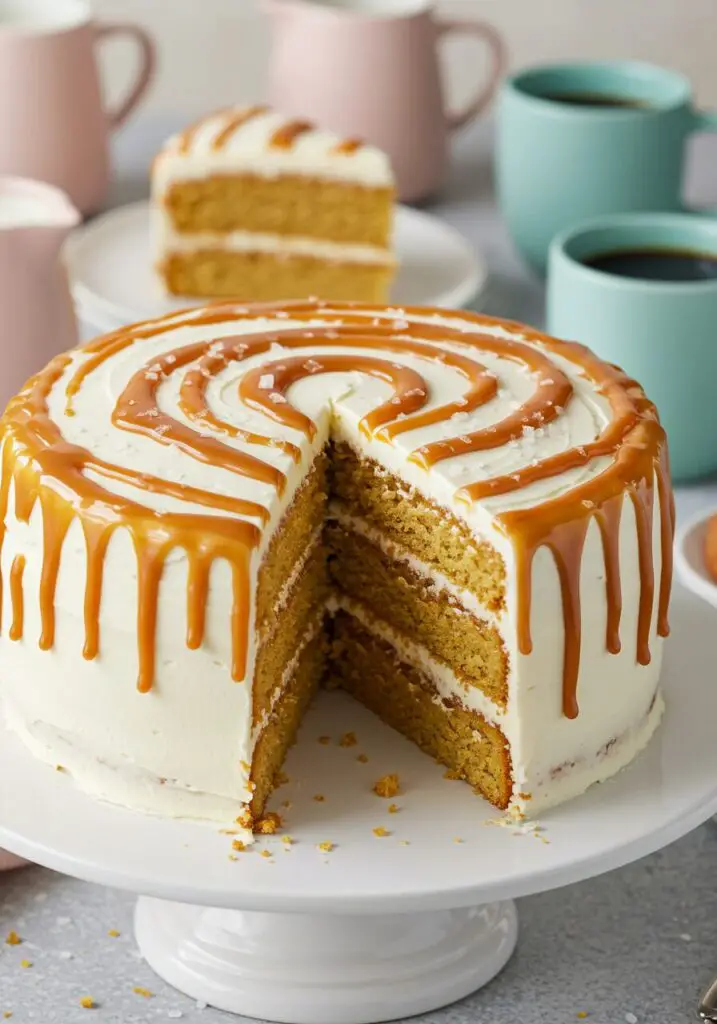
Oh, my friends, prepare yourselves for a dessert that is nothing short of pure, unadulterated decadence! If you’ve been dreaming of a cake that not only tastes absolutely incredible but also looks like it stepped right off the pages of a gourmet magazine, then today at WiseRecipes, I’m beyond thrilled to share my recipe for this show-stopping Salted Caramel Drip Cake! Seriously, imagine three tender, buttery sponge layers, lavishly filled with luscious salted caramel frosting, and then crowned with a cascade of homemade, glistening salted caramel dripping elegantly down the sides. It’s a symphony of sweet, salty, and utterly rich flavors, and it is pure bliss in every single slice!
I just adore a recipe that feels incredibly special and celebratory, yet is surprisingly achievable in a home kitchen. This cake is exactly that! It’s a fantastic way to transform simple ingredients into a truly unforgettable centerpiece for birthdays, anniversaries, or any occasion that calls for something extra-extraordinary. Forget dry, bland cakes; this one is packed with moisture and that irresistible caramel flavor in every single component. While it takes a little love and patience with the chilling, I promise you, the active time is manageable, and the “oohs” and “aahs” you’ll get are worth every moment. This Salted Caramel Drip Cake serves a generous 12, so get ready to share the sweet joy (or hide a slice for yourself!). Trust me, once you try this incredible combination, you’ll be making it again and again!
Why This Salted Caramel Drip Cake Is About to Become Your Signature Dessert!
This isn’t just another cake recipe; it’s a celebration in every slice. Here’s why I’m absolutely smitten with it:
- Complete Caramel Decadence: From the moist, golden sponge to the creamy frosting and the glossy drip, every single element of this cake is infused with rich, buttery salted caramel flavor. It’s an absolute dream for caramel lovers!
- Stunning Drip Cake Effect: That iconic, elegant salted caramel drip cascading down the sides isn’t just beautiful; it’s surprisingly easy to achieve with our homemade caramel, making your cake look professionally decorated.
- Three Layers of Tender Sponge: We’re baking three perfectly golden, tender, and moist cake layers that provide the perfect foundation for our generous frosting and caramel filling.
- Luscious Salted Caramel Frosting: This isn’t just any buttercream! It’s infused with homemade salted caramel, making it incredibly flavorful, smooth, and utterly irresistible.
- Impressive, Yet Achievable: Despite looking like a masterpiece, this recipe breaks down into manageable steps. You’ll impress everyone with your baking prowess, even if you’re new to layered cakes!
Your Shopping List for Caramel Cake Bliss: Gather What You’ll Need
Creating this incredible Salted Caramel Drip Cake uses a blend of classic baking ingredients and a few special touches. Here’s what you’ll want to grab to get started!
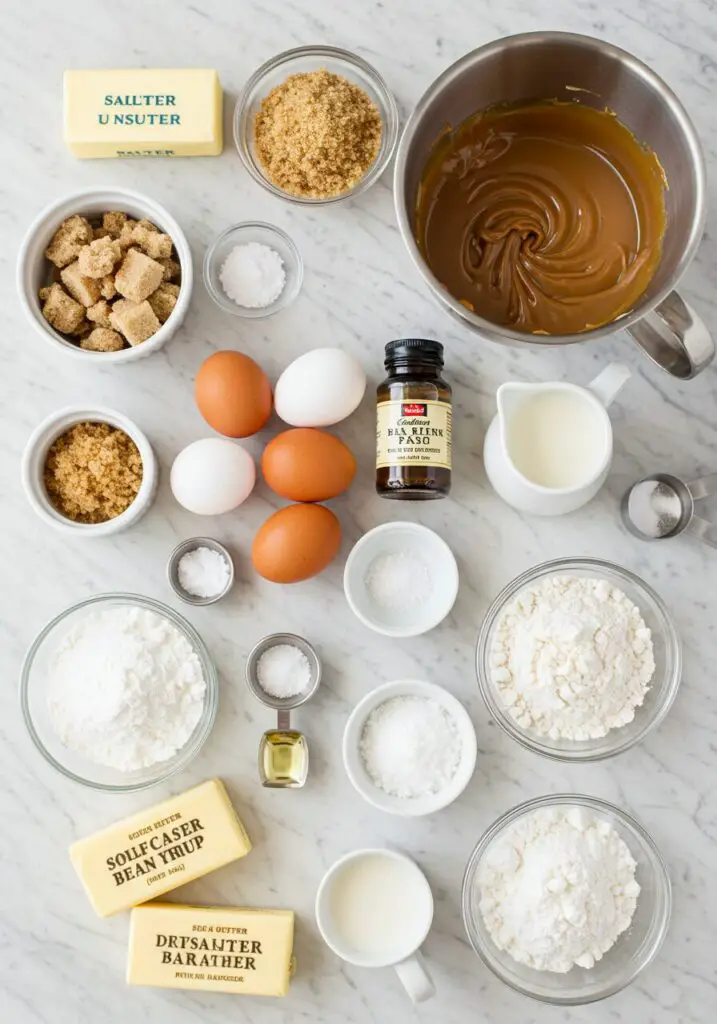
→ For the Moist & Golden Cake Layers
- 250g (9oz) unsalted butter, softened: Plus extra for greasing. The base for our tender cake.
- 100g (3½oz) golden caster sugar: For sweetness and a fine crumb.
- 100g (3½oz) soft light brown sugar: Adds a lovely molasses note and moisture.
- 100g (3½oz) golden syrup: Adds moisture, a gorgeous golden hue, and a unique flavor.
- 4 medium free-range eggs, lightly beaten: Binds the batter and adds richness.
- 2 tsp vanilla bean paste: For intense, aromatic vanilla flavor (or vanilla extract).
- 350g (12oz) self-raising flour: Our leavening agent for a beautifully risen sponge.
- 1 tsp baking powder: Works with the self-raising flour for extra fluffiness.
- ½ tsp sea salt flakes, crushed: To balance the sweetness and enhance flavors.
- 100ml (3½fl oz) milk: For extra moisture and tenderness.
→ For the Homemade Salted Caramel Sauce
- 250g (9oz) caster sugar: The base for our rich caramel.
- 2 tbsp water: To help dissolve the sugar initially.
- 125g (4½oz) soured cream: Creates a smooth, tangy, and creamy caramel.
- 30g (1oz) unsalted butter: Adds richness and gloss.
- 1 tsp vanilla bean paste: Enhances the caramel flavor.
- ½ tsp sea salt flakes: The essential “salted” component – crucial for balance!
→ For the Dreamy Salted Caramel Frosting
- 250g (9oz) unsalted butter, softened: The base for our luscious, creamy frosting.
- 2 tsp vanilla bean paste: For intense vanilla aroma.
- 425–450g (15oz–1lb) icing sugar, sifted: For sweetness and smooth consistency.
- 3–4 tbsp milk: To achieve a smooth, spreadable buttercream.
- Pinch salt: To balance the sweetness.
- 150g (5½oz) of the prepared salted caramel: Our secret for infusing the frosting with rich caramel flavor!
Let’s Bake! Crafting Your Perfect Salted Caramel Drip Cake, Step-by-Step
This recipe has a few components, but they are all very manageable. Take your time, enjoy the process, and soon you’ll have a show-stopping cake!
Part 1: Baking Our Golden Sponge Layers
- Preheat Oven & Prep Tins: First things first! Heat your oven to 180°C / 160°C Fan / Gas 4 (or 350°F / 325°F convection). Grease and line the bases of three 18cm (7-inch) cake tins with buttered baking paper.
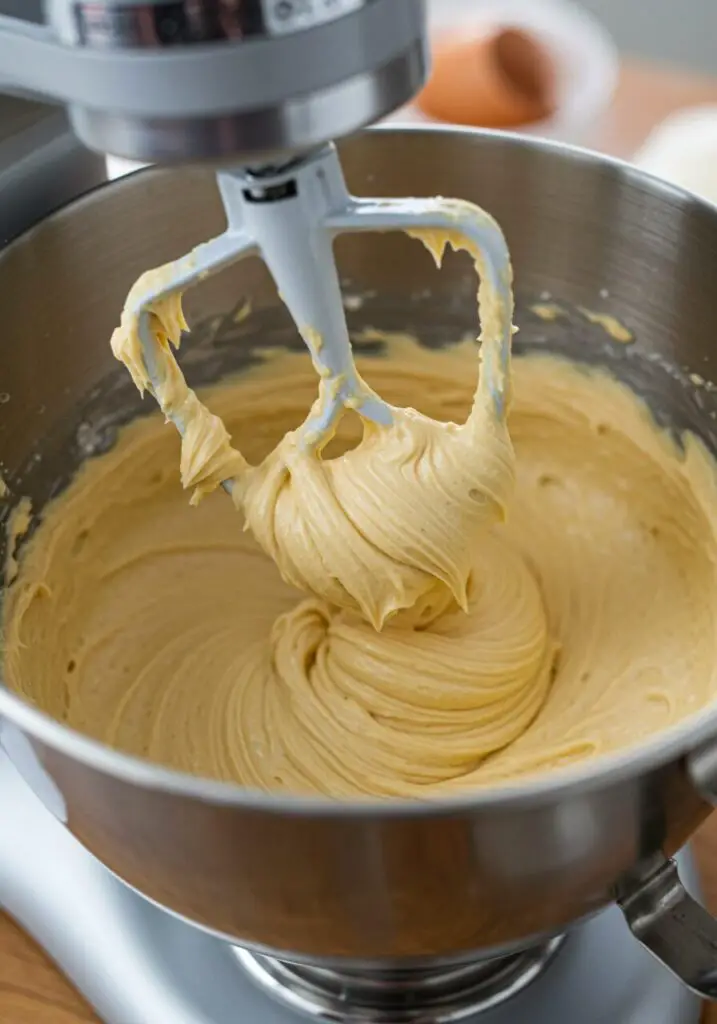
- Cream Butter & Sugars: In a freestanding mixer fitted with a creamer attachment (or a large bowl using hand-held beaters), cream the 250g softened unsalted butter with 100g golden caster sugar, 100g soft light brown sugar, and 100g golden syrup. Beat for about 5 minutes until the mixture is beautifully pale and light.
- Add Eggs & Vanilla: Add the 4 lightly beaten medium free-range eggs one at a time, beating well between each addition and scraping down the sides of the bowl with a rubber spatula. Add 2 teaspoons vanilla bean paste and mix again to combine.
- Fold in Dry & Wet: Sift the 350g self-raising flour, 1 teaspoon baking powder, and ½ teaspoon crushed sea salt flakes into the bowl. Gently fold until almost combined. Then, fold in the 100ml milk until the batter is nearly smooth.
- Final Mix (Optional): If using a stand mixer, mix for a final 30 seconds on low speed until the batter is silky smooth. Be careful not to over-mix if doing by hand!
- Bake Cake Layers: Divide the mixture evenly between your three prepared tins. Spread level with the back of a spoon or a palette knife. Bake on the middle shelf of the preheated oven for 25 minutes, or until well risen, golden brown, and a wooden skewer inserted into the middle of the cake comes out clean.
- Cool Cakes: Leave the cakes to cool in their tins for 2–3 minutes, then carefully turn them out onto a wire rack. Leave until completely cold while you prepare the salted caramel sauce.
Part 2: Crafting Our Homemade Salted Caramel Sauce
- Melt Sugar for Caramel: In a medium-sized, heavy-bottomed saucepan, tip in 250g caster sugar and add 2 tablespoons of water. Set the pan over a low heat to dissolve the sugar without stirring. Gently swirl the pan from time to time to ensure even dissolving. As it melts, brush the sides of the pan with a wet pastry brush to melt any sugar crystals that may have formed.
- Cook Caramel: Once all the sugar has dissolved, increase the heat to medium and bring the syrup to a boil. Continue to cook, without stirring, until the syrup becomes a beautiful deep amber color. Swirl the pan occasionally to ensure the caramel cooks evenly. This usually takes 5-10 minutes. Watch it closely – it can burn quickly!
- Add Cream & Butter: Carefully slide the hot pan off the heat (be cautious, as it will bubble up!). Add the 125g soured cream and 30g unsalted butter. Stir gently to combine. If any caramel hardens, return the pan to a very low heat briefly to re-melt it, stirring continuously.
- Finish Caramel: Add 1 teaspoon vanilla bean paste and ½ teaspoon sea salt flakes to the caramel. Mix to combine. Pour the finished salted caramel into a heatproof bowl and leave it to cool until needed (it will thicken as it cools). Reserve about 150g (5½oz) of this caramel for the frosting, and the rest for the drip and filling.
Part 3: Whipping Up the Salted Caramel Frosting
- Cream Butter & Caramel: In a freestanding mixer fitted with a paddle attachment (or a large bowl with electric beaters), cream the 250g softened unsalted butter with 150g (5½oz) of your prepared salted caramel (from step 11) and 2 teaspoons vanilla bean paste. Beat for 3–4 minutes, or until the mixture is wonderfully soft and light.
- Add Icing Sugar & Milk: Gradually add the 425–450g of sifted icing sugar (start with 425g, adding more if needed) and 3–4 tablespoons of milk, a little at a time. Beat until thoroughly combined, scraping down the sides of the bowl with a rubber spatula.
- Whip Frosting: Continue to beat for a further 3–4 minutes, or until the frosting is incredibly light and fluffy. Add a pinch of salt to taste.
Part 4: Assembling & Decorating Our Drip Cake
- Layer & Fill Cake: Place one cooled cake layer on a cake serving plate or stand. Spread the top with 1 tablespoon of the remaining salted caramel (from step 11 – the portion not used in the frosting). Then, spread 3 tablespoons of the prepared buttercream frosting over the caramel. Top with another cake layer and repeat the spreading with caramel and buttercream. Finish with the third cake layer.
- Crumb Coat & Chill: Cover the entire top and sides of the stacked cake with a thin, even coat of buttercream frosting using a large palette knife. This is your “crumb coat,” designed to seal in any loose crumbs. Chill the cake in the fridge for 30 minutes until the crumb coat is firm. Set aside the remaining frosting at room temperature.
- Final Frosting Layer: Once the crumb coat is firm, remove the cake from the fridge. Cover the top and sides of the cake with another smooth, even layer of the remaining buttercream, using a cake smoother or large palette knife to get it really smooth. Pipe any leftover frosting (if desired) over the top of the cake for extra decoration.
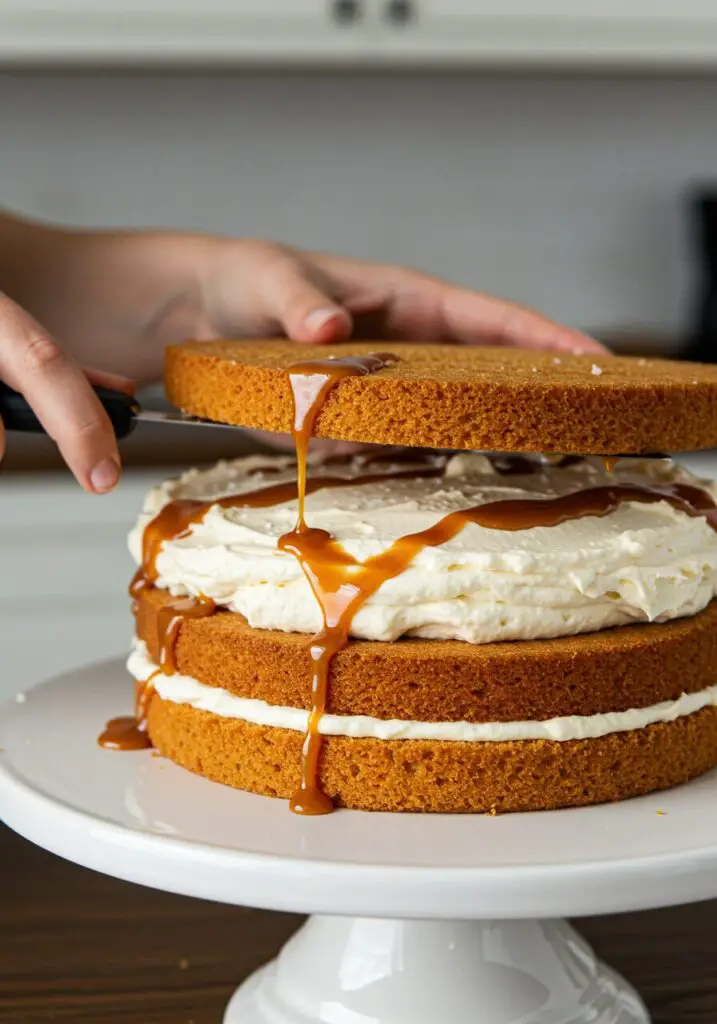
- The Caramel Drip! Gently warm the remaining salted caramel sauce (from step 11) if it has thickened too much – you want it pourable but not too hot or runny. Carefully drizzle the caramel over the top and down the sides of the cake, allowing it to drip elegantly.
- Serve & Enjoy! Slice into generous portions and serve immediately. Prepare for jaws to drop and compliments to flow!

WiseRecipes’ Top Tips for Drip Cake Perfection
This show-stopping cake takes a little dedication, but these WiseRecipes insights will help you achieve Salted Caramel Drip Cake mastery every single time!
- Room Temperature Ingredients are GOLD: For cake batters and buttercreams, softened butter, room-temperature eggs, and milk are crucial. They combine more smoothly, creating light, airy cakes and smooth, lump-free frosting.
- Patience with Caramel: Making caramel requires patience and close attention! Don’t stir the sugar while it’s dissolving or cooking; just swirl the pan. Watch it like a hawk as it darkens – it can go from perfect to burnt in seconds. Have your soured cream and butter ready to add immediately when it reaches a deep amber.
- Chill Times are Non-Negotiable: The chilling steps (for the cake layers, after the crumb coat) are absolutely vital for stability, easy frosting, and preventing your cake from sliding or crumbling. Don’t rush them!
- Crumb Coat Magic: The crumb coat is your absolute best friend for a smooth, professional-looking cake! It traps all those pesky loose crumbs, ensuring your final layer of icing is perfectly pristine.
- Sift Your Icing Sugar: Always sieve your icing sugar for the frosting. This prevents lumps and ensures a silky-smooth, easy-to-spread icing. Gradually adding it helps prevent splitting too!
- Warm the Drip (Gently!): For the perfect caramel drip, the caramel needs to be warm enough to flow but not hot enough to melt your frosting. Test a tiny drip on the side of the cake first!
Creative Twists: Delicious Ways to Customize Your Salted Caramel Drip Cake
This Salted Caramel Drip Cake is already a show-stopper, but it’s also a fantastic canvas for your culinary creativity! Here are some ideas I love to play with:
- Add Chocolate: For a chocolate-caramel dream, you could make two layers of chocolate sponge and one vanilla, or add chocolate chips to the sponge batter. A sprinkle of chocolate shavings or curls on top would also be gorgeous.
- Nutty Crunch: Fold in a handful of chopped toasted pecans or walnuts into the cake batter, or sprinkle them on top of the final caramel drip for extra texture.
- Espresso Boost: Add ½ teaspoon of instant espresso powder to the cake batter with the flour, and another tiny pinch to the caramel sauce, for a delicious mocha-caramel twist.
- Boozy Kick (Adults Only!): A splash of bourbon, rum, or a coffee liqueur could be added to the cooled salted caramel sauce for an extra layer of boozy flavor.
- Different Sponges: While our golden sponge is divine, you could also experiment with a vanilla bean sponge or a brown sugar sponge for a slightly different flavor profile.
- Decorative Flourish: Beyond the caramel drip, pipe extra swirls of frosting, add edible gold dust, or top with some crunchy caramel popcorn for a truly extravagant finish!
Salted Caramel Drip Cake (Pure Decadence! A Show-Stopping Masterpiece!)
Ingredients
Equipment
Method
- Heat the oven to 180C/160C Fan/Gas 4. Grease and line the bases of 3 x 18cm/7in cake tins with buttered baking paper.
- Cream 250g butter with golden caster sugar, soft light brown sugar and golden syrup for about 5 minutes until pale and light.
- Add the eggs one at a time, beating well between additions and scraping down the bowl. Add vanilla and mix.
- Sift flour, baking powder, and crushed sea salt flakes into the bowl and fold in until almost combined. Fold in the milk until nearly smooth. Mix for 30 seconds until silky smooth (if using stand mixer).
- Divide mixture evenly between tins, spread level, and bake for 25 minutes until well risen, golden, and a skewer comes out clean.
- Leave cakes to cool in tins for 2–3 minutes, then turn out onto a wire rack and leave until cold.
- Tip 250g caster sugar into a medium, heavy bottomed saucepan with 2 tbsp water. Set over a low heat to dissolve sugar without stirring (swirl pan occasionally). Brush sides with water to melt crystals.
- Once dissolved, increase heat to medium and bring to a boil. Cook until syrup becomes a deep amber colour, swirling pan (do not stir).
- Carefully slide pan off heat and add soured cream and 30g butter. Stir gently. Return to low heat to re-melt any hardened caramel, stirring.
- Add 1 tsp vanilla and ½ tsp sea salt flakes, mix. Pour into a bowl and cool until needed. (Reserve 150g for frosting, rest for drip/filling).
- Cream 250g softened butter with 150g (5½oz) salted caramel (from previous step) and 2 tsp vanilla bean paste for 3–4 minutes until soft and light.
- Gradually add 425–450g sifted icing sugar and 3–4 tbsp milk, beating until thoroughly combined. Scrape down bowl and beat for 3–4 minutes more until light and fluffy. Add a pinch of salt.
- Place one cake layer on a cake serving plate. Spread with 1 tbsp salted caramel and then 3 tbsp buttercream frosting. Top with another cake layer and repeat. Finish with the third cake layer.
- Cover top and sides of the cake with a thin coat of buttercream (crumb coat). Chill in the fridge for 30 minutes until firm. (Keep remaining frosting at room temp).
- Cover the top and sides of the cake with another smooth layer of buttercream. Pipe any leftover frosting over the top.
- Drizzle the remaining salted caramel (warmed gently if needed) over the top and down the sides of the cake. Serve.
Notes
Keep It Beautiful! Storing Your Salted Caramel Drip Cake
You’ve created a masterpiece, so let’s make sure it stays fresh and delicious!
- Room Temperature Storage: This Salted Caramel Drip Cake, once fully assembled and decorated, is best stored in a cool, dry place (covered with a cake dome or in an airtight container) at room temperature for up to 2-3 days. If your kitchen is very warm, consider refrigerating.
- Refrigerator Storage: If you need to keep it longer, or if your kitchen is warm, you can store the cake (covered tightly) in the refrigerator for up to 4-5 days. Allow it to come to room temperature for about 30-60 minutes before serving for the best flavor and texture.
- Freezing Baked Cake Layers (Un-frosted/Un-caramelized): You can freeze the baked and completely cooled cake layers. Wrap each layer tightly in plastic wrap, then in foil. Freeze for up to 1-2 months. Thaw overnight in the refrigerator, then bring to room temperature before frosting and assembling.
- Freezing Salted Caramel Sauce: The homemade salted caramel sauce can be frozen in an airtight container for up to 1 month. Thaw in the fridge, then gently reheat to a drizzly consistency before using.
- Freezing Frosting: The salted caramel frosting can be frozen in an airtight container for up to 1 month. Thaw in the fridge, then bring to room temperature and re-whip with an electric mixer until fluffy again before using.
FAQs: Your Top Salted Caramel Drip Cake Questions, Answered!
Q: Can I use store-bought caramel sauce for the drip?
A: Yes, you can! For a shortcut, use a good quality store-bought caramel sauce for the drip. You might need to gently warm it slightly to achieve the perfect drizzly consistency. However, making your own from scratch is truly rewarding and gives the best flavor!
Q: My caramel seized up when I added the soured cream. What happened?
A: This is common! When cold or cool cream hits hot caramel, it can seize. The key is to gently stir immediately and return the pan to a very low heat. Keep stirring until the hardened caramel re-melts and smooths out. Ensure your soured cream isn’t fridge-cold, or warm it slightly before adding.
Q: How do I get my cake layers completely flat?
A: After baking and cooling, use a long, sharp serrated knife to carefully slice off any domed tops from your cake layers. This ensures your cake layers stack flat and straight, creating a stable, professional-looking cake.
Q: Can I make this cake gluten-free?
A: You can attempt a gluten-free version! Substitute the self-raising flour with a good quality gluten-free self-raising flour blend (or a GF all-purpose flour plus baking powder). Ensure all other ingredients are certified gluten-free. Note that GF cakes sometimes have a slightly different texture.
Q: What’s the best way to get a smooth frosting finish on the sides?
A: The “crumb coat” is essential! After that’s chilled, apply your final layer of frosting. Use an offset spatula or a cake smoother, holding it straight against the side of the cake and rotating your cake stand (if you have one) to smooth the frosting evenly. Practice makes perfect!
And there you have it, my friends—your guide to crafting the most delightful, impressive, and truly unforgettable Salted Caramel Drip Cake! This WiseRecipes creation is more than just a cake; it’s a testament to how simple ingredients, when treated with a little love and smart steps, can come together to create something truly extraordinary. It’s a vibrant, exciting meal that you’ll genuinely look forward to eating, day after day.
I am genuinely so excited for you to try these and experience the delicious magic yourself. Please, please come back and let me know in the comments below what your favorite part of this decadent drip cake was, or any fun twists you tried! Happy cooking from WiseRecipes!