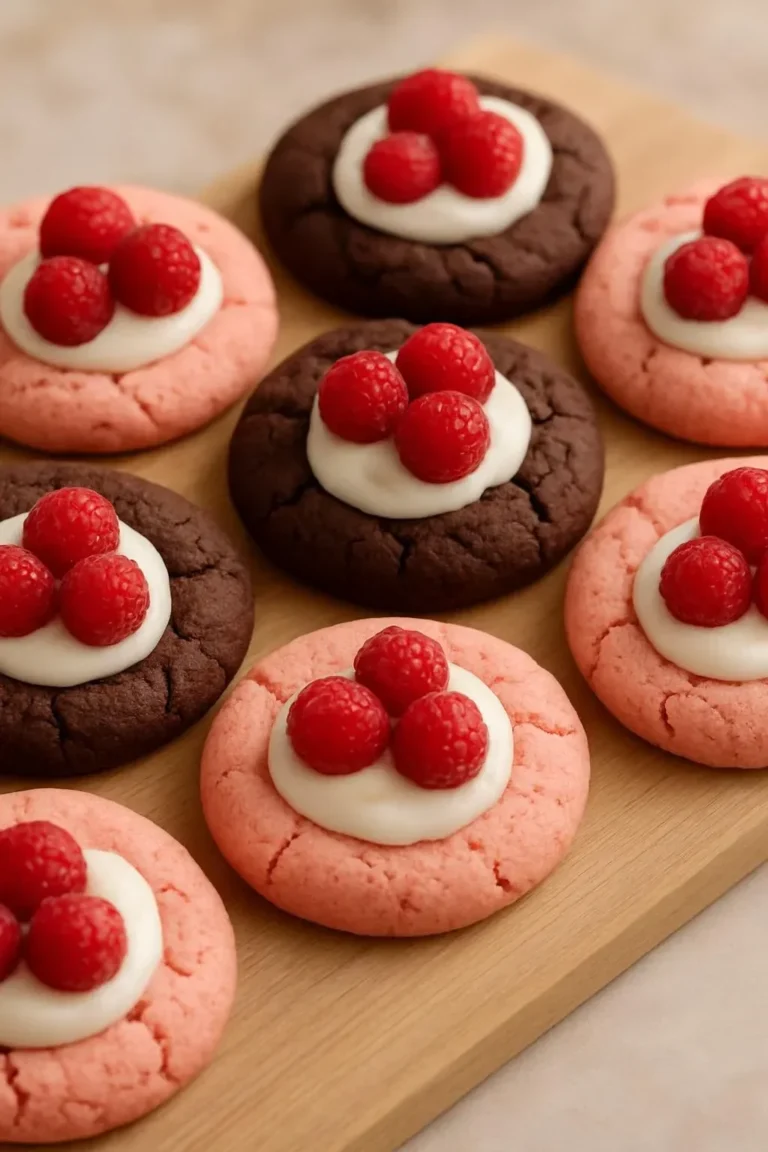
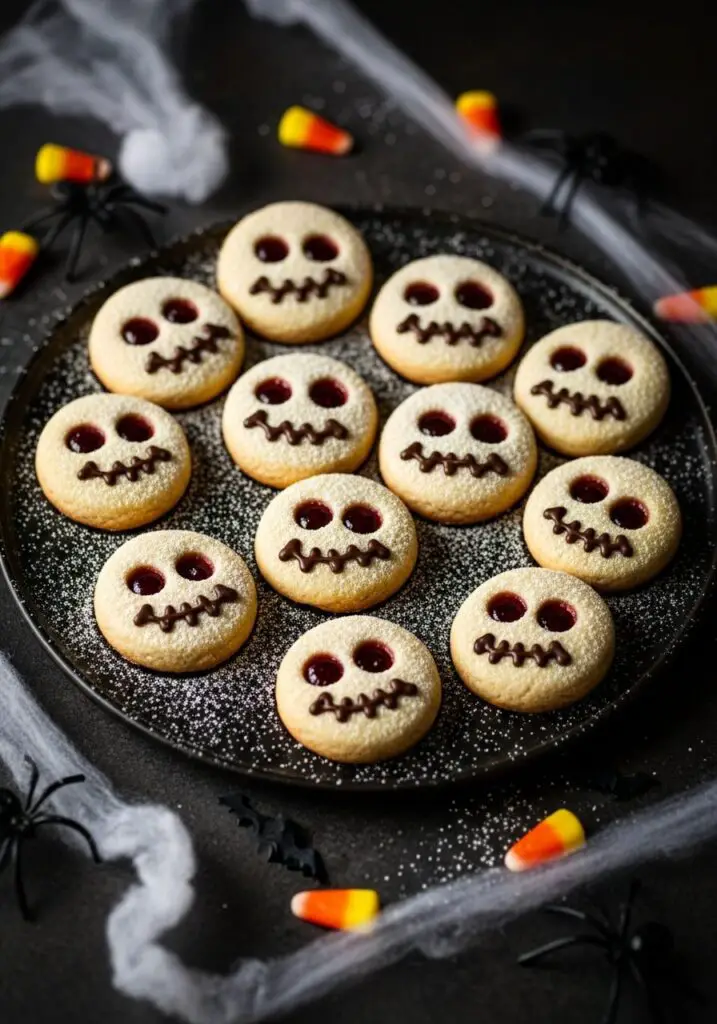
Easy Skeleton Cookies: Your Kids’ New Favorite Halloween Snack!
There’s a special kind of magic that fills the kitchen during Halloween season. It’s a time for playful spooky fun, and what better way to capture that spirit than with a batch of cookies that are as fun to make as they are to eat? These Skeleton Thumbprint Cookies are my absolute favorite Halloween baking…
There’s a special kind of magic that fills the kitchen during Halloween season. It’s a time for playful spooky fun, and what better way to capture that spirit than with a batch of cookies that are as fun to make as they are to eat? These Skeleton Thumbprint Cookies are my absolute favorite Halloween baking project to do with kids. They are the perfect blend of spooky and sweet! We start with a rich, buttery, melt-in-your-mouth shortbread that is incredibly easy to make. Then, with a few clever pokes and prods, we transform the simple dough into a skull shape, complete with deep eye sockets that we fill with a dark, glistening blackberry jam. After a quick bake, the final touch of a piped chocolate smile brings these charmingly ghoulish faces to life. The first time I made these, my kitchen counter was a happy mess of flour, jam, and chocolate, and the kids were so proud of their spooky creations. These cookies are more than just a treat; they’re a memory in the making, and the perfect, not-so-scary snack for your little monsters.
Why These Spooky Cookies Will Be a Halloween Hit!
- A Fun, Kid-Friendly Project: Rolling the dough, making the imprints, and piping the mouths is a fantastic, hands-on activity for kids of all ages.
- Deliciously Buttery & Tender: This is no ordinary sugar cookie. It’s a rich, tender shortbread that has a wonderful, melt-in-your-mouth texture that adults will love just as much as kids.
- Perfectly Spooky, Not Scary: With their jammy eyes and simple smiles, these skeletons are more charming than chilling, making them ideal for school parties and younger children.
- Great for Making Ahead: You can make the dough or even the baked, undecorated cookies a few days in advance, which is a lifesaver for busy Halloween schedules.
- Simple Ingredients, Big Impact: You don’t need a long list of specialty ingredients to create these impressive-looking treats. They are a masterpiece of pantry-staple baking!
Recipe Snapshot
| Prep Time | 30 minutes (+ 30 mins chilling) |
| Cook Time | 15 minutes |
| Total Time | 1 hour 15 minutes |
| Servings | 30 cookies |
| Calories | See recipe card for details |
| Course | Dessert, Snack |
| Cuisine | American, Halloween |
| Method | Baking |
Your Spooky Baker’s Shopping List
Creating these ghoulishly good treats is easy with these simple, classic cookie ingredients.
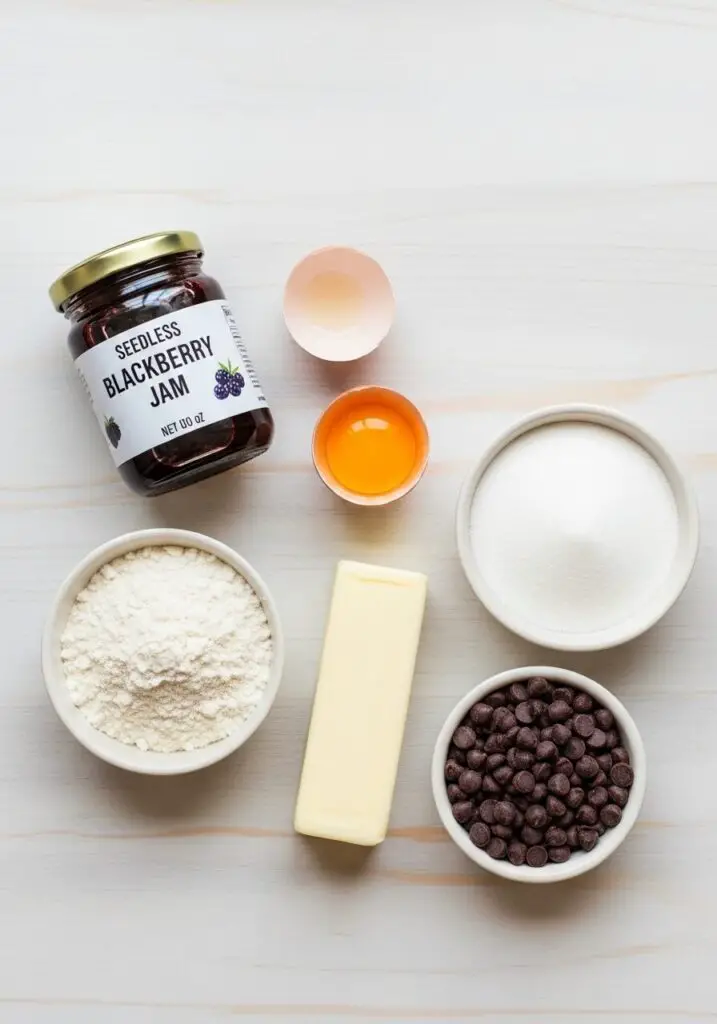
→ For the Buttery Shortbread Cookies
- Unsalted Butter: 1 cup (2 sticks). It must be softened to room temperature for a light, fluffy cookie base.
- Sugar: 1/2 cup of granulated sugar.
- Large Egg Yolk: 1. This adds richness and helps bind the dough without making it tough.
- Pure Vanilla Extract: 2 teaspoons. For that classic, warm flavor.
- All-Purpose Flour: 2 1/4 cups. Be sure to spoon it into your measuring cup and level it off for an accurate measurement.
- Kosher Salt: 1/2 teaspoon, to balance the sweetness.
→ For the Skeleton Decorations
- Seedless Blackberry Jam: 2/3 cup. The dark, rich color is perfect for creating spooky, hollow-looking eyes.
- Dark Chocolate Chips: 1/2 cup, for melting and piping the mouths.
- Black Gel Food Coloring: Optional, but a few drops will make your melted chocolate extra dark and spooky.
Let’s Bake Some Bones! Crafting Your Skeleton Cookies, Step-by-Step
This is a fun, four-phase process. We’ll make the dough, shape our spooky faces, bake, and then bring them to life with a little decorating magic!
Phase 1: Make the Shortbread Dough (Time: ~5 minutes + 30 mins chilling)
The foundation of our cookie is a rich, tender, and easy-to-handle shortbread dough.
- Cream Butter and Sugar. Line a baking sheet with parchment paper. In a large bowl, using an electric mixer on medium speed, beat the softened butter and sugar together for 1-2 minutes until light and fluffy.
- Add Wet Ingredients. Add the egg yolk and vanilla and beat until just combined.
- Combine and Chill. Reduce the mixer speed to low and gradually beat in the flour and salt until a soft dough forms.
Pro Tip: At this stage, the recipe doesn’t call for chilling, but I find that chilling the dough for 30 minutes makes it much easier to roll into smooth, non-sticky balls. I highly recommend it!
Phase 2: Shape the Skeleton Faces (Time: ~15 minutes + 30 mins chilling)
Now for the most creative part! Let’s turn our dough balls into spooky skulls.
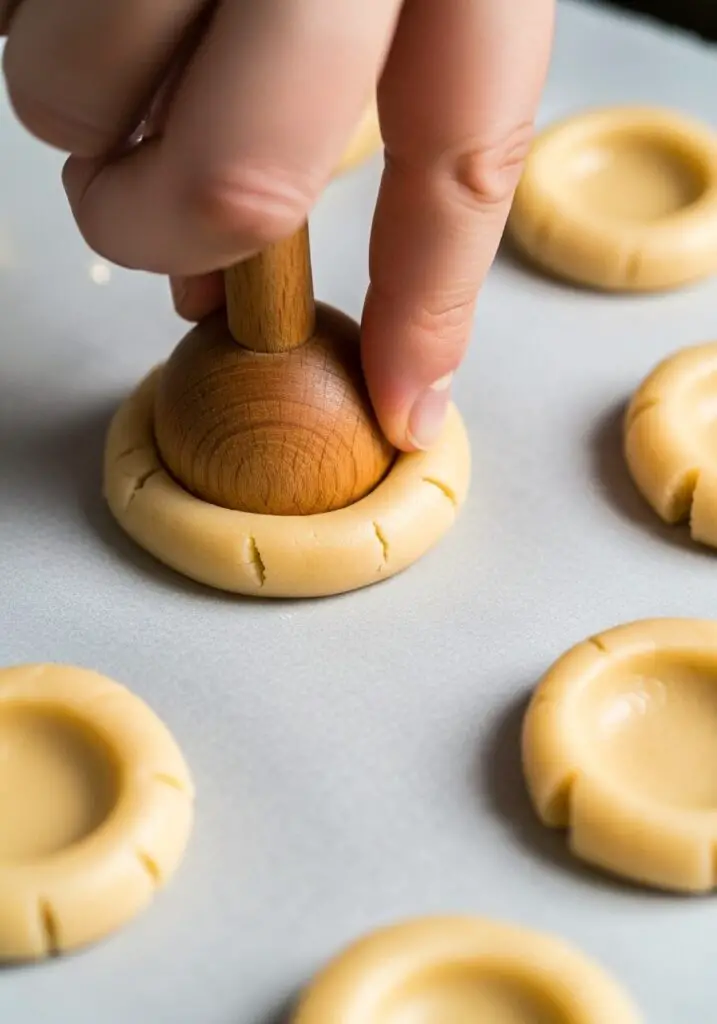
- Shape the Cookies. Scoop the dough into 1-tablespoon portions and roll them into smooth balls. Place them on your prepared baking sheet, spaced about 1 inch apart. Gently press with your palm to flatten them slightly.
- Create the Face. Now for the details! Use the flat end of a single-point toothpick or a skewer to press two small, deep “nostrils” into the center of each cookie. Then, use the round handle-end of a wooden spoon to press two larger, deep indentations for the eye sockets in the top half of each cookie.
- Fill the Eyes. Carefully spoon a small amount of the blackberry jam into each of the two eye socket indentations.
- Chill Again! This is a crucial step. Place the entire baking sheet of shaped cookies into the refrigerator to chill for 30 minutes.
Why it matters: This final chill solidifies the butter in the dough, which is the secret to preventing the cookies from spreading in the oven and losing their spooky shape!
Phase 3: Bake and Cool (Time: ~15 minutes + cooling)
It’s time for the oven to work its magic.
- Preheat and Bake. While the cookies are chilling, preheat your oven to 350°F. Once chilled, bake the cookies for 14 to 15 minutes. You’re looking for them to be slightly puffed and just set around the edges; you don’t want them to get golden brown.
- Cool Completely. Let the cookies cool on the pan for 15 minutes before carefully transferring them to a wire rack to cool completely. They must be 100% cool before you pipe the chocolate mouths.
Phase 4: The Finishing Touch (Time: ~10 minutes)
The final step that brings our charming skeletons to life!
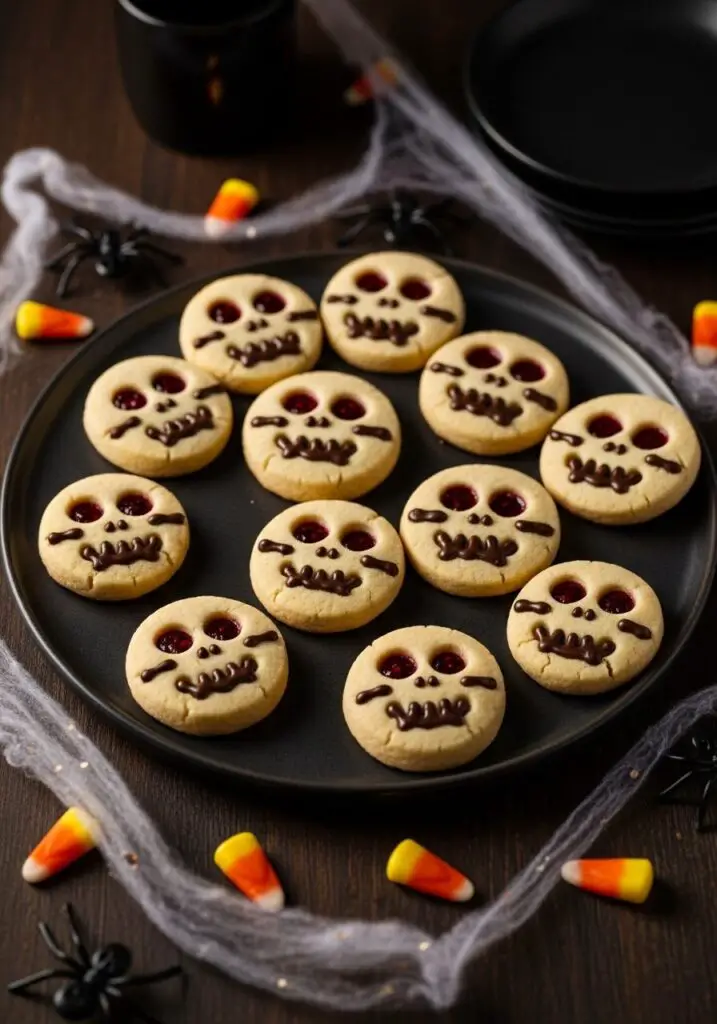
- Prep the Chocolate. Melt the dark chocolate chips in a small, microwave-safe bowl in short bursts. If you want a really dark, black mouth, stir in a few drops of the black gel food coloring.
- Pipe the Mouths. Transfer the melted chocolate to a small piping bag fitted with a small round tip (or a zip-top bag with a tiny corner snipped off). Carefully pipe spooky mouths onto the bottom half of each cookie. You can do simple lines, stitched mouths, or goofy smiles!
- Let it Set. Let the cookies sit at room temperature until the chocolate has completely set before you stack or store them.
WiseRecipes’ Top Tips for Perfect Skeleton Cookies!
- Don’t Skip the Chilling: Chilling the shaped cookies for 30 minutes before baking is the most important step for ensuring they hold their skull shape and don’t spread into blobs in the oven.
- Use Room Temperature Butter: Starting with properly softened butter is key to getting that light, fluffy texture when you cream it with the sugar, which leads to a tender cookie.
- Make Deep Indentations: Don’t be shy when pressing the eye sockets with the end of your wooden spoon. You need a nice, deep well to hold a good amount of that delicious jam.
- Use Seedless Jam: For the smoothest, most “hollow-looking” eyes, seedless blackberry or raspberry jam is the way to go.
- Spoon and Level Your Flour: For a perfect shortbread texture, avoid scooping flour directly from the bag. Use a spoon to fluff it up and fill your measuring cup, then level it off with a knife. This prevents a dense, dry cookie.
Creative & Creepy Customizations!
- Try Different “Eyes”: A vibrant red seedless raspberry or strawberry jam would look extra spooky and “bloody.”
- Add a Bow: After the chocolate has set, use a little extra melted chocolate to “glue” a small, festive candy bow to the top of some of the skulls.
- Make Cyclops Skeletons: Instead of two eyes, make one large central eye for a cyclops skull!
- Vampire Skeletons: Use a toothpick to drag a little of the red jam down from the corner of the chocolate mouth to look like a vampire fang.
- Chocolate Shortbread Base: Replace 1/4 cup of the flour with unsweetened cocoa powder for a delicious chocolate skeleton cookie.
Spooky Skeleton Thumbprint Cookies
Ingredients
Equipment
Method
- Beat butter and sugar with an electric mixer until light and fluffy. Add egg yolk and vanilla and beat until combined. Reduce speed to low and beat in flour and salt until a soft dough forms.
- Scoop dough by the tablespoon onto a parchment-lined baking sheet. Roll into balls and flatten slightly. Use the flat end of a toothpick to make two nostrils in the center. Use the round end of a wooden spoon to press two eye indentations into the top half.
- Spoon jam into the eye indentations. Chill the entire baking sheet of cookies for 30 minutes.
- Preheat oven to 350°F. Bake the chilled cookies until edges are set, 14 to 15 minutes. Cool on the pan for 15 minutes, then transfer to a wire rack to cool completely.
- If desired, stir black food coloring into the melted chocolate. Transfer to a piping bag with a small round tip.
- Pipe spooky mouths onto the cooled cookies. Let the chocolate set completely before serving or storing.
Notes
Keep Them Spooky! Storing Your Halloween Cookies
These cookies are perfect for making ahead of a party, as they store beautifully.
Room Temperature Storage
Once the chocolate has fully set, you can store the Skeleton Thumbprint Cookies in an airtight container at room temperature for up to 3-4 days. Place sheets of parchment paper between the layers to protect the decorations.
FAQs: Your Spooky Cookie Questions, Answered!
Can I make the dough ahead of time?
Yes, absolutely! The shortbread dough can be made, wrapped tightly in plastic, and stored in the refrigerator for up to 3 days before you’re ready to shape and bake your cookies.
Why did my cookies spread out and lose their shape?
This is almost always because the dough was too warm when it went into the oven. The final 30-minute chill in the refrigerator after shaping the cookies is the crucial step that prevents this from happening.
What if I don’t have a piping bag for the mouths?
No problem at all! A small zip-top plastic bag is a perfect substitute. Just spoon the melted chocolate into the bag, push it down to one corner, and snip off a tiny bit of the corner. It works just like a piping bag!
Can I use a different kind of jam?
You can, but the visual effect works best with a dark, seedless jam like blackberry or raspberry. An orange marmalade could work for a pumpkin-like feel, but lighter jams won’t look as much like spooky, hollow eyes.
These Skeleton Thumbprint Cookies are the perfect combination of a delicious, buttery treat and a fun, creative Halloween project. They are a wonderful way to get the whole family into the kitchen and create something that’s both spooky and sweet. I hope they bring a lot of smiles and happy nibbles to your celebration. Happy Halloween baking!