French Dip Squares
Discovering French Dip Squares Growing up, my family often gathered around the dinner table for hearty meals that filled both our bellies and our hearts. One dish that always had everyone coming back for seconds was French Dip Squares. You know, the kind that oozes with cheese, savory beef, and just enough indulgence to make…
Discovering French Dip Squares
Growing up, my family often gathered around the dinner table for hearty meals that filled both our bellies and our hearts. One dish that always had everyone coming back for seconds was French Dip Squares. You know, the kind that oozes with cheese, savory beef, and just enough indulgence to make everyone smile? I remember the first time I made this—my house smelled incredible, and the excitement was palpable. If you’re looking for a meal that merges convenience with comfort, this is just what you need! You may also find Crockpot French Dip Sandwiches 2 useful.
To whip up these delicious squares, you’ll need a handful of ingredients: two cans of refrigerated crescent rolls, half a pound of deli-sliced roast beef, a cup of grated Swiss cheese, and a packet of dry onion soup mix. Oh, and don’t forget about the melted butter, Worcestershire sauce, garlic powder, and some beef broth for dipping that really brings everything together. You’ll find that it’s a straightforward process that’ll have anyone thinking you’ve spent hours in the kitchen!
The Secret to Perfectly Layered Squares
I often start by preheating the oven to 375°F (190°C). As the oven warms up, I lightly spray my trusty 9×13 inch baking dish with non-stick cooking spray to ensure nothing sticks—this step is crucial! Then, I roll out one can of the crescent rolls in the bottom of the baking dish, pressing any seams together. This forms the perfect flaky base for the layers to come.
Next, I layer the deli-sliced roast beef evenly over this dough, followed by a generous sprinkle of Swiss cheese. Oh, the melty goodness that awaits is enough to make your mouth water! It’s like a symphony of flavors that will have you dreaming of indulgent evenings. To tie all of this deliciousness together, I mix the dry onion soup mix with melted butter, Worcestershire sauce, and garlic powder, drizzling this heavenly mixture over the cheese layer. You won’t want to skip this step—it’s the magic touch.
Mastering the Baking Process
Once I’ve topped everything with the second can of crescent rolls, I pinch the seams together to create a smooth top layer. This part is super satisfying; you can see how everything is coming together! I then pop the dish in the oven and bake it for about 15-20 minutes. Just keep an eye on it until those crescent rolls are golden brown and fully cooked.
While the squares are baking, I gently warm up the beef broth in a small pot over medium heat, allowing it to become the perfect dipping sauce. There’s something about the scent of the broth simmering that makes the anticipation even sweeter.
Once the baking is done, I let the French Dip Squares cool slightly. They’re easier to cut into squares when they’ve had a moment to settle. Serving it up with the warmed broth for dipping turns a simple dinner into an experience that everyone at the table will remember.
Enhancing the Flavors: Tips and Tricks
If you want to tweak the flavors a bit, consider adding some sautéed mushrooms or roasted red peppers alongside the roast beef. These additions can elevate your dish to the next level, making it versatile enough for any palate.
Also, if you’re a fan of herbs, a sprinkle of fresh thyme or rosemary can add an unexpected twist that complements the savory elements beautifully. If you don’t have Swiss cheese on hand, feel free to experiment with provolone or mozzarella for a different flavor profile. It’s all about making it yours!
Make-Ahead and Leftovers
One of the best parts about French Dip Squares is that they can be prepared ahead of time. You can assemble everything up to the baking step, cover it, and pop it in the refrigerator for a couple of hours (or even overnight!) before finishing the baking process. Perfect for busy weeknights when you want something quick yet impressive.
When it comes to leftovers, they store beautifully in an airtight container in the fridge for a couple of days. I recommend reheating them in the oven to keep that flaky texture intact. Just a few minutes at 350°F (175°C) should do the trick!
More French Dip Delights
If you’re as enamored with French dip flavors as I am, you might want to check out other related recipes that bring that same warm, comforting feeling. One that stands out is a delightful crockpot French dip sandwich recipe that highlights the same tender flavors but in sandwich form. It’s a lifesaver for gatherings or you just want an easy meal for the week.
Conclusion
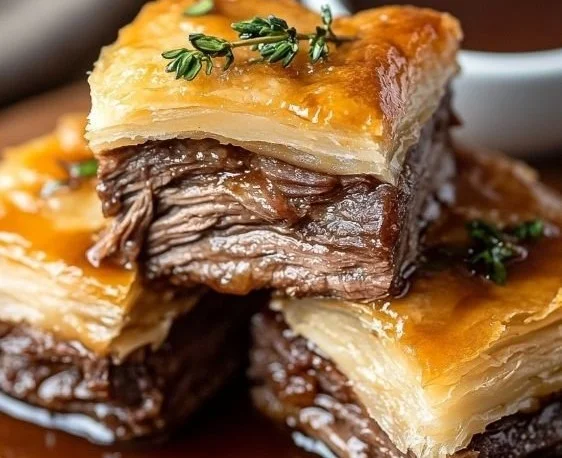
French Dip Squares are truly a dish that brings people together, whether you’re having a cozy weeknight dinner or entertaining guests. The combination of roasted beef, melted cheese, and that rich dipping broth is simply irresistible. For more inspiration to expand your culinary repertoire, be sure to check out these incredible French Dip Squares from The Country Cook. Happy cooking!
French Dip Squares
Ingredients
Method
- Preheat the oven to 375°F (190°C).
- Lightly spray a 9x13 inch baking dish with non-stick cooking spray.
- Roll out one can of the crescent rolls in the bottom of the baking dish, pressing any seams together.
- Layer the deli-sliced roast beef evenly over the dough.
- Sprinkle the grated Swiss cheese over the beef.
- Mix the dry onion soup mix with melted butter, Worcestershire sauce, and garlic powder, and drizzle this mixture over the cheese.
- Top everything with the second can of crescent rolls and pinch the seams together.
- Bake in the preheated oven for 15-20 minutes until the crescent rolls are golden brown and fully cooked.
- While the squares are baking, gently warm up the beef broth in a small pot over medium heat.
- After baking, let the squares cool slightly before cutting into squares.
- Serve with the warmed broth for dipping.