No-Bake 4th of July Swirl Pie
A Delicious 4th of July Treat As the 4th of July approaches, I start thinking about the perfect way to celebrate. There’s something magical about getting together with friends and family, enjoying fireworks, and indulging in festive treats. One dessert that has become a staple at my gatherings is the No-Bake 4th of July Swirl…
A Delicious 4th of July Treat
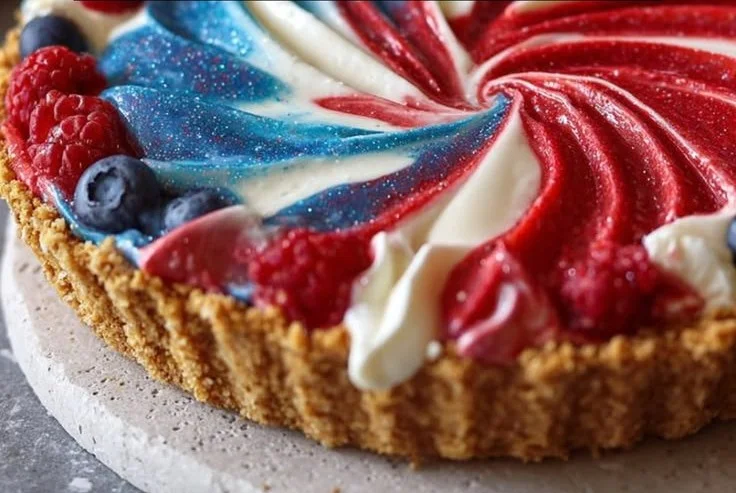
As the 4th of July approaches, I start thinking about the perfect way to celebrate. There’s something magical about getting together with friends and family, enjoying fireworks, and indulging in festive treats. One dessert that has become a staple at my gatherings is the No-Bake 4th of July Swirl Pie. This pie is not only easy to make, but it also captures the spirit of the holiday with its vibrant red, white, and blue colors. If you’re looking for a show-stopping dessert that requires minimal effort, this is it! You may also find 4Th Of July Swirl Pie useful.
The beauty of this pie lies in the combination of creamy filling, a buttery crust, and an array of fresh berries. Using cream cheese and whipped cream gives it a light texture that melts in your mouth. The graham cracker crust adds just the right amount of crunch. You’ll love how simple it is to whip up this recipe, and it can be made ahead of time, leaving you more time to enjoy the festivities.
The Ingredients You’ll Need
Let’s dive into what you’ll need to make this delightful pie. The ingredients are quite straightforward, which makes the preparation as enjoyable as the eating. Here’s what goes into the No-Bake 4th of July Swirl Pie:
- 1/2 cup graham cracker crumbs
- 1/4 cup butter, melted
- 8 oz cream cheese, softened (ensuring it’s softened helps in the mixing)
- 1/2 cup powdered sugar
- 1 tsp vanilla extract
- 1 cup heavy whipping cream (make sure it’s whipped until stiff peaks form)
- 1 cup mixed berries (think strawberries, blueberries, and raspberries, slightly crushed to unlock their juices)
I find that using fresh berries not only provides great flavor but also elevates the presentation of the pie. You can certainly use frozen berries if that’s what you have on hand, but I recommend letting them thaw completely and draining any excess liquid beforehand for a cleaner look.
Crafting the Perfect Crust
Creating the crust is the first step in bringing this pie together. Start by combining the graham cracker crumbs and melted butter in a bowl. I love the aroma of melted butter mixing with sweet crumbs; it feels like the beginning of something great. Once combined, press the mixture firmly into the bottom and up the sides of a pie dish. This creates a sturdy base for your filling.
You don’t need to bake it, which is one of the best parts! Simply pop it in the refrigerator for about 30 minutes to set while you prepare the filling.
Getting the Filling Just Right
Now, let’s move to the filling, which is where the magic truly happens. In a mixing bowl, beat the softened cream cheese until it’s smooth and fluffy. Gradually add the powdered sugar and vanilla extract; this will sweeten the mixture and give it a lovely flavor. As I mix, I can’t help but taste test a little—just a small spoonful, of course.
Next comes the heavy whipping cream. It’s essential to whip this until stiff peaks form; this step adds the light and airy texture that makes the pie so special. Gently fold the whipped cream into the cream cheese mixture, being careful not to deflate it too much. This is often the trickiest part, but it’s worth taking your time.
Now for the color! Divide the mixture into three bowls. Leave one bowl plain, then fold in crushed strawberries or raspberries into the second bowl, and crushed blueberries into the third bowl. The colorful layers will be the highlight of your pie.
Layering Like a Pro
With the crust set and the filling ready, it’s time to layer everything beautifully into the crust. Start by spooning in the plain filling, then carefully layer in the red filling next, followed by the blue. Use a skewer or a knife to swirl them together gently for that patriotic swirl effect.
After all the fillings are in, cover the pie with plastic wrap and let it chill in the refrigerator for at least four hours, or overnight if you can resist. The longer it sets, the better the flavors meld together, and you’re guaranteed a more solid slice.
Enjoying the Final Product
When you’re ready to serve, the joy of slicing into a beautifully swirled pie is unmatched. I often garnish it with additional fresh berries or a sprig of mint for that extra pop of color. This No-Bake 4th of July Swirl Pie pairs wonderfully with a scoop of vanilla ice cream or a dollop of whipped cream on the side.
Be sure to check out my delightful recipe for Patriotic Rice Krispie Treats to complete your 4th of July dessert table!
Storing Leftovers
If you happen to have any leftovers, which is rare in my household, they can be covered and stored in the refrigerator for up to three days. The flavors actually become even more pronounced as they sit! Just make sure to keep it tightly wrapped to maintain its freshness.
Conclusion
Now that you know how to create this stunning No-Bake 4th of July Swirl Pie, I hope it becomes a favorite in your home as it has in mine. Whether it’s for a summer gathering or a special celebration, this pie is sure to impress. Don’t forget to explore this delicious no-bake cheesecake option for another festive dessert to add to your spread! Enjoy the holiday and the sweet flavors of summer!
No-Bake 4th of July Swirl Pie
Ingredients
Method
- Combine the graham cracker crumbs and melted butter in a bowl.
- Press the mixture firmly into the bottom and up the sides of a pie dish.
- Refrigerate for about 30 minutes to set.
- In a mixing bowl, beat the softened cream cheese until smooth and fluffy.
- Gradually add the powdered sugar and vanilla extract.
- Whip the heavy cream until stiff peaks form and gently fold into the cream cheese mixture.
- Divide the mixture into three bowls: leave one bowl plain, fold crushed strawberries or raspberries into the second bowl, and crushed blueberries into the third bowl.
- Spoon in the plain filling into the refrigerated crust.
- Carefully layer the red filling next, followed by the blue.
- Use a skewer or knife to swirl the fillings together.
- Cover with plastic wrap and refrigerate for at least four hours or overnight.
- Garnish with additional fresh berries or a sprig of mint before serving.
- Pair with vanilla ice cream or a dollop of whipped cream.