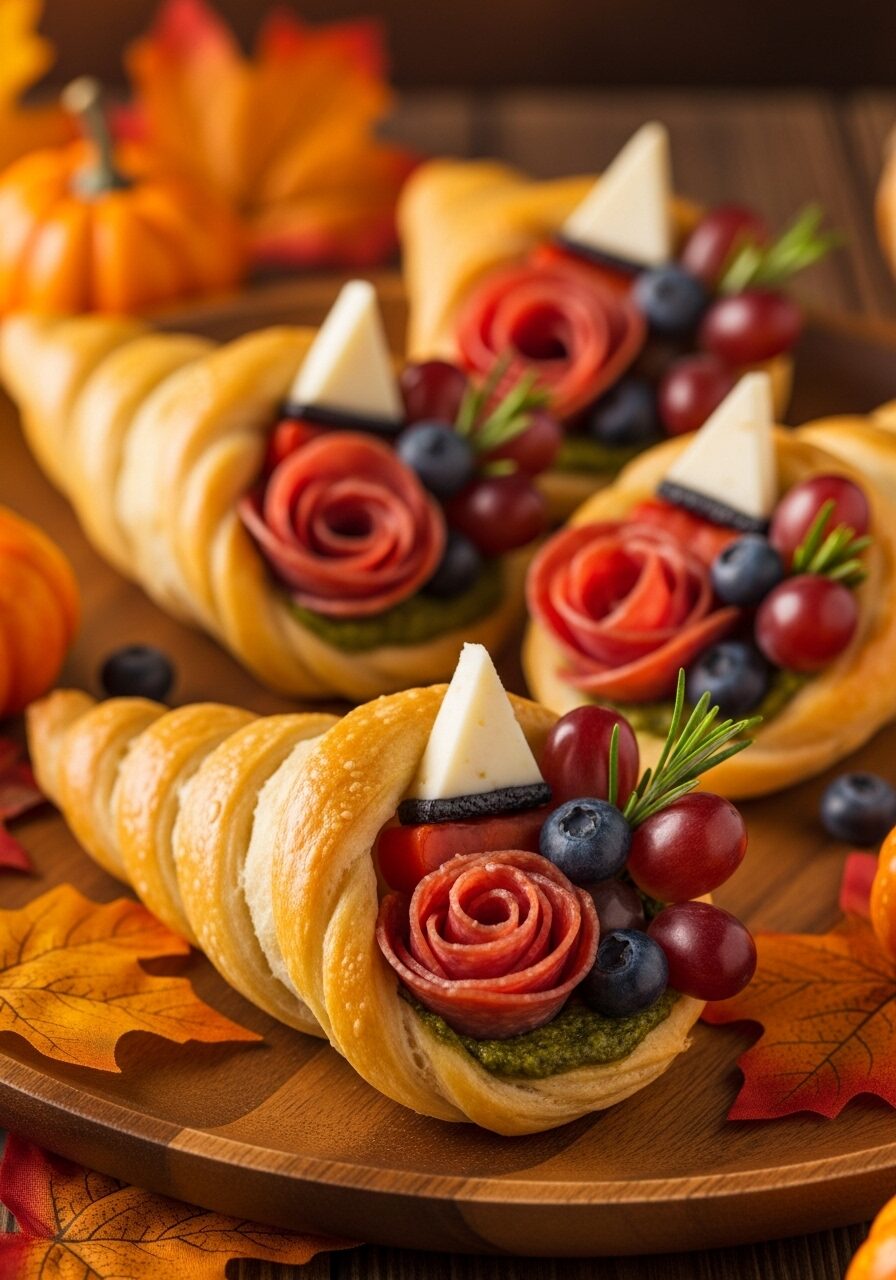
The Ultimate Cornucopia Charcuterie Cups (A Stunning Thanksgiving Appetizer!)
Imagine your guests arriving for Thanksgiving, and instead of a typical cheese board, they’re greeted by a platter of miniature, edible horns of plenty. Each golden, crisp bread cornucopia is overflowing with its own personal treasure trove of cured meats, artisan cheeses, and vibrant berries. This, my friends, is not just an appetizer; it’s a…
Imagine your guests arriving for Thanksgiving, and instead of a typical cheese board, they’re greeted by a platter of miniature, edible horns of plenty. Each golden, crisp bread cornucopia is overflowing with its own personal treasure trove of cured meats, artisan cheeses, and vibrant berries. This, my friends, is not just an appetizer; it’s a conversation starter, a centerpiece, and the most memorable first bite of the holiday.
Here’s my thing with big holiday gatherings: I love a classic charcuterie board, but it can get a little crowded and messy. These individual cups were my “aha!” moment. I wanted something more festive than a simple cone, something that screamed “autumn harvest.” Using a brilliant shortcut of canned bread dough and my trusty air fryer, this stunning idea came to life, and it was so much easier than I ever imagined.
I promise you, this is one of the most fun and impressive appetizers you will ever make. They look like a complicated bakery creation, but they are secretly so simple to assemble. It’s a wonderful project that results in the perfect, personalized portion for each guest, making them feel truly special.
Get ready to master a simple, clever technique that will make you the undisputed hero of the holiday appetizer table.

Why These Are Your New Favorite Thanksgiving Appetizer!
You are going to have an absolute blast making these, and your guests will be completely wowed. They are a guaranteed hit! Here’s why:
- A Total Show-Stopper: Let’s be honest, they are incredibly impressive! The edible cornucopia shape is so unique and perfectly on-theme for Thanksgiving and fall.
- Perfectly Portioned & Hygienic: No more crowding around a single board! These individual cups are the perfect, elegant solution for parties, making it easy for guests to grab and mingle.
- Surprisingly Easy with the Air Fryer: Thanks to canned bread dough and the magic of the air fryer, these golden horns of plenty cook up perfectly crisp in under 10 minutes.
- A Fun, Creative Project: Shaping and wrapping the dough is a genuinely fun, hands-on activity. It’s like a festive, edible art project!
- Completely Customizable: The filling possibilities are endless! You can fill them with any of your favorite charcuterie meats, cheeses, fruits, and nuts.
Recipe Snapshot
| Prep Time | 25 minutes |
| Cook Time | 7 minutes |
| Total Time | 32 minutes (+ cooling) |
| Servings | 6 cornucopias |
| Calories | Not Provided |
| Course | Appetizer |
| Cuisine | American |
| Difficulty/Method | Easy / Air Fryer |
Your Shopping List for a Horn of Plenty
This recipe is broken down into two fun parts: creating the edible vessel and choosing the delicious fillings!

→ For the Edible Bread Cornucopias
- 1 can refrigerated French bread dough → Pillsbury is a great choice! You can also use canned pizza dough in a pinch.
- 1 egg → For our egg wash, which is the secret to a beautiful, golden-brown shine.
- Cooking spray → Absolutely essential for preventing the dough from sticking to the foil molds.
- Aluminum foil → For creating the cornucopia-shaped molds.
→ For the Charcuterie Filling (Suggestions)
- Cheeses: Cubed or triangled pesto Monterey Jack, sharp cheddar, or creamy brie.
- Meats: Folded slices of pepperoni and salami.
- Fruits: Grapes, blueberries, blackberries, and quartered strawberries.
- Nuts: Roasted and salted pistachios or almonds.
- Fresh Herbs: Sprigs of fresh sage and rosemary for a beautiful, aromatic garnish.
Let’s Craft! Making Your Edible Cornucopias, Step-by-Step
Ready to create something amazing? This process is part kitchen craft, part recipe, and all fun!
Part 1: Shaping the Cornucopias
- Prep the Dough: Unroll your canned dough onto a lightly floured surface. Using a pizza cutter or a sharp knife, cut the dough into long, thin strips, about ¼-inch wide.
- Create the Foil Molds: Tear off six pieces of aluminum foil. For each one, start at a corner and loosely mold it into a cone or cornucopia shape. It doesn’t need to be perfectly tight; a little air inside is good.
- Wrap the Dough: Generously spray the outside of each foil mold with cooking spray. Starting at the pointy tip of a mold, begin wrapping one dough strip around it in a spiral. Overlap the edges slightly. When you get to the end of a strip, just press the end of a new strip onto it and continue wrapping.
- Create the Decorative Opening: For the final strip at the wide opening, fold it in half and twist it to create a spiral rope. Brush the edge of the cornucopia with a little egg wash (1 egg beaten with a splash of water) and press the twisted rope on top to create a beautiful, decorative rim.

Part 2: The Air Fryer Magic & Final Assembly
- Egg Wash & Preheat: Brush the entire outside of each dough-wrapped cornucopia with the egg wash. This will give them a gorgeous golden shine. Preheat your air fryer to 325°F (160°C).
- Air Fry to Golden Perfection: Place the cornucopias in your air fryer basket, making sure they don’t touch. You may need to work in batches. Cook at 325°F for 6-7 minutes, until they are beautifully golden brown and cooked through.
- Cool and Unmold: Carefully remove the cornucopias from the air fryer and let them cool completely. Once cool, gently twist and pull out the aluminum foil molds.
- Fill Your Horn of Plenty!: Now for the best part! Artfully fill your cooled, edible cornucopias with your prepared cheeses, meats, fruits, nuts, and fresh herbs. Arrange them on a platter and get ready for the compliments to roll in!

WiseRecipes’ Top Tips for Perfect Cornucopias
This is a unique technique! These little secrets will help you nail it on the first try.
- Don’t Skimp on the Cooking Spray. Be generous when you spray the foil molds. This is the number one thing that will ensure your beautiful bread cones slide off easily after cooling.
- Overlap Your Dough Strips. As you wrap the dough around the foil, make sure you slightly overlap the edges of the strips. This prevents gaps from forming as the dough puffs up during cooking.
- The Egg Wash is Not Optional! It’s the secret to that beautiful, shiny, deep golden-brown finish. Without it, the bread will look pale and matte.
- Let Them Cool COMPLETELY. You must let the bread cornucopias cool all the way down before you try to remove the foil and definitely before you fill them. If they’re warm, they will be soft and delicate and could tear.
- Work in Batches. Don’t overcrowd your air fryer basket! Give the cornucopias plenty of space for the hot air to circulate all around them. This is key for even cooking and a crispy texture.
Cornucopia Charcuterie Cups
Ingredients
Method
- Unroll the bread dough and cut it into long, thin strips, about ¼-inch wide.
- Mold 6 pieces of aluminum foil into cone/cornucopia shapes. Spray the outside of each foil mold generously with cooking spray.
- Starting at the pointy tip, wrap the dough strips in a spiral around each foil mold, overlapping the edges slightly. Create a decorative twisted rope for the opening rim.
- Beat the egg with a splash of water to create an egg wash. Brush the egg wash over the entire surface of the dough.
- Preheat the air fryer to 325°F (160°C). Place the cornucopias in the air fryer basket, ensuring they don’t touch. Work in batches if necessary.
- Cook for 6-7 minutes, until golden brown and cooked through.
- Remove from the air fryer and let them cool completely before gently twisting and removing the foil molds.
- Fill the cooled bread cornucopias with your desired charcuterie items and serve.
Notes
Creative Twists: Delicious Ways to Customize Them
These edible cones are a perfect canvas for your culinary creativity! Here are some fun ideas:
- Make Them Savory: Before baking, brush the egg-washed dough with melted butter and sprinkle with everything bagel seasoning, garlic salt, or grated Parmesan cheese.
- Sweet Dessert Cornucopias: Brush the dough with melted butter and sprinkle with cinnamon sugar before baking. Fill the cooled cones with a cannoli-style cream cheese filling and mini chocolate chips.
- Caprese Cups: Fill with cherry tomatoes, fresh mozzarella balls, and basil leaves, then drizzle with a balsamic glaze.
- Veggie Crudité Cups: Fill the bottom with a dollop of hummus or ranch dip and stand up some colorful veggie sticks like carrots, celery, and bell peppers.
- Use Different Dough: Canned pizza dough will create a sturdier, chewier cornucopia. Crescent roll dough would also work for a flakier, more delicate version.
- Fruit & Nutella: A perfect dessert version! Fill with Nutella and fresh berries.
- Miniature Versions: Make smaller foil cones and use fewer dough strips to create adorable, two-bite cornucopias.
- Antipasto Style: Fill with marinated artichoke hearts, olives, roasted red peppers, and mozzarella balls.
Keep It Fresh! Make-Ahead & Storing Guide
This is the perfect make-ahead appetizer! Here’s the best way to do it.
- Make-Ahead Plan: The best method is to bake the bread cornucopias a day in advance. Let them cool completely, then store them in an airtight container at room temperature. Prep all your charcuterie fillings and store them in separate containers in the fridge. On party day, all you have to do is the fun part: assemble!
- Storing Filled Cornucopias: These are best assembled right before serving to keep the bread from getting soggy. If you have leftovers, store them in an airtight container in the fridge for up to a day.
FAQs: Your Cornucopia Questions, Answered!
Can I make these in a regular oven instead of an air fryer?
Yes, absolutely! Just preheat your oven to 375°F (190°C). Place the prepared cornucopias on a parchment-lined baking sheet and bake for 12-15 minutes, or until they are golden brown and cooked through.
Can I use wax paper in my air fryer?
No, this is very important: NEVER use wax paper in an air fryer or an oven. The wax coating will melt at high temperatures and can smoke or even catch fire. If you need to line your air fryer basket, always use parchment paper specifically designed for air fryers (it has holes in it) or regular parchment paper if your basket design allows for airflow.
My dough is sticking to the foil mold! What did I do wrong?
This almost always means the foil wasn’t greased well enough with cooking spray. You need to be quite liberal with it, making sure to cover the entire surface where the dough will touch. Let the bread cool completely before attempting to remove the foil also helps a lot.
What’s the best dough to use for this?
A can of refrigerated French bread dough (like Pillsbury) is fantastic because it’s sturdy and bakes up with a nice crust. Refrigerated pizza dough is another great, sturdy option. Crescent roll dough will work, but it will create a much softer and more delicate cornucopia, so you’ll need to be extra gentle with it.
My Final Thoughts: The Ultimate Thanksgiving Welcome
These Cornucopia Charcuterie Cups are more than just an appetizer; they are a fun, festive activity that results in a truly special and memorable treat for your guests. They are the perfect, delicious way to say “welcome” and “happy Thanksgiving.” I hope you have an absolute blast creating and sharing these little horns of plenty!


![[HEALTHY] Zucchini Superfood Slice: Your Ultimate 50-Min Meal Prep Hero!](https://wiserecipes.com/wp-content/uploads/2025/09/image-15-768x1097.jpg)