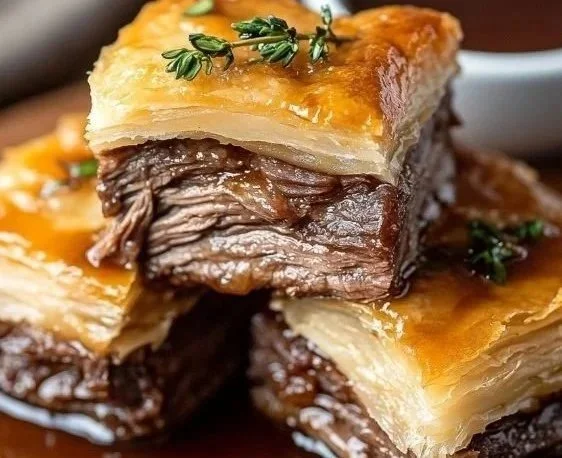
French Dip Squares
Discovering the Joy of French Dip Squares There’s something truly comforting about a warm, savory dish that just feels like a warm hug. That’s exactly how I feel every time I prepare French Dip Squares. This delightful recipe combines the simple goodness of crescent rolls with the hearty flavor of roast beef, drizzled with a…
Discovering the Joy of French Dip Squares
There’s something truly comforting about a warm, savory dish that just feels like a warm hug. That’s exactly how I feel every time I prepare French Dip Squares. This delightful recipe combines the simple goodness of crescent rolls with the hearty flavor of roast beef, drizzled with a rich, savory sauce. It’s a dish that brings people together, sparking joy and conversation, and I can’t wait to share how easy it is to whip up. You may also find French Dip Squares useful.
The Ingredients that Make It All Work
Making French Dip Squares requires just a handful of ingredients, most of which you probably have on hand already. You’ll need two cans of refrigerated crescent rolls, a half-pound of deli-sliced roast beef (which is the star of the show), and a cup of grated Swiss cheese to bring that creamy, melty goodness. To elevate the flavors, we’ll use a packet of dry onion soup mix, a quarter cup of melted butter, a tablespoon of Worcestershire sauce, and a teaspoon of garlic powder. Oh, and don’t forget the beef broth, about a cup, as it’s perfect for dipping!
Getting Started in the Kitchen
To dive in, preheat your oven to 375°F (190°C). Then, lightly spray a 9×13 inch baking dish with non-stick cooking spray and roll out one of the cans of crescent rolls in the bottom of the dish. Make sure to press any seams together so that it forms a nice, uniform base. This is a crucial step for maintaining the integrity of the squares and ensuring a uniform bake.
Next, layer the deli-sliced roast beef evenly over the dough. Trust me, the more generous you are here, the better your squares will taste. After the roast beef goes down, sprinkle the grated Swiss cheese over the top. This melty layer is what makes biting into these squares so satisfying.
Adding Flavor with a Simple Mixture
In a separate bowl, combine the dry onion soup mix with the melted butter, Worcestershire sauce, and garlic powder. Mix this until it’s well-combined, and then drizzle it over the cheese layer. This step adds a depth of flavor that really elevates the dish. Then, roll out the second can of crescent rolls over the top, pinching the seams together to seal everything in.
Now it’s time to let the oven do its magic! Bake the dish for 15-20 minutes or until the top is golden brown and the kitchen smells incredible. The anticipation is half the joy! While the squares cool for just a few minutes, go ahead and warm up the beef broth in a pot over medium heat. This dipping sauce pairs perfectly with the savory squares and is an essential part of the whole experience.
The Perfect Serving Suggestion
Once the squares have cooled slightly, cut them into squares, and serve them warm alongside the beef broth for dipping. It’s an awesome treat for game days, gatherings with friends, or a cozy family dinner. I often find that people can’t help but go back for seconds – they’re just that good!
If you’re wondering about variations, one of my favorites includes adding sautéed mushrooms or caramelized onions to the roast beef layer for an added flavor boost. Or, if you’re feeling adventurous, try using different cheeses like provolone or pepper jack for a spicy kick.
When You Need to Make This Ahead
These French Dip Squares are also a great option for meal-prepping. If I know I’ll be busy during the week, I prepare a batch in advance, allowing the flavors to meld even more. Just store them covered in the refrigerator once they cool, and they’ll be ready to be reheated whenever you need a quick meal.
Let’s Talk About Leftovers
If by chance you find yourself with leftovers (which is rare in my house!), simply store any extra squares in an airtight container. They will keep well in the fridge for about three to four days. You can reheat them in the oven to maintain that crispy texture, which is much better than using the microwave.
The Best Part About This Recipe
What I love most about French Dip Squares is their versatile nature. Whether you’re serving them for a casual movie night or a more formal gathering, they fit right in. If you’re keen to explore other delicious options with similar flavors, consider checking out these crockpot French dip sandwiches for an easy alternative!
Conclusion
From the irresistible aroma wafting through the kitchen to the first bite of those deliciously cheesy squares, French Dip Squares has become a staple in my home. This recipe is truly special, and if you’re intrigued, you can also discover more about preparing French Dip Squares on The Country Cook. Enjoy your cooking adventure, and may each bite bring you warmth and joy!