Red Velvet Cake
A Slice of Joy: My Favorite Red Velvet Cake Recipe There’s something magical about the way a classic red velvet cake captures attention at gatherings. Its vibrant, ruby-red layers paired with that luscious cream cheese frosting make it not just a dessert, but a memorable centerpiece. Every time I dive into making this cake, I…
A Slice of Joy: My Favorite Red Velvet Cake Recipe
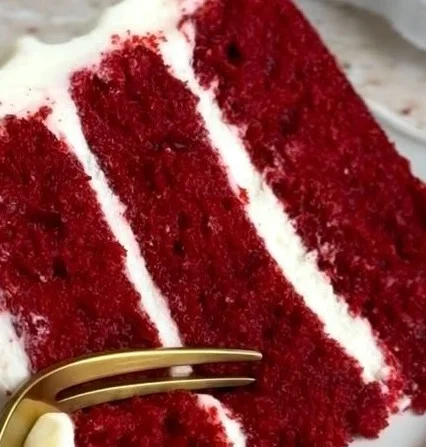
There’s something magical about the way a classic red velvet cake captures attention at gatherings. Its vibrant, ruby-red layers paired with that luscious cream cheese frosting make it not just a dessert, but a memorable centerpiece. Every time I dive into making this cake, I can’t help but think about the first time I tasted it at a friend’s birthday. It was love at first slice, and since then, I’ve perfected my own recipe. Trust me, this one is a keeper!
I remember the first time I attempted to bake a red velvet cake. I was nervous; it seemed complicated, with its bold color and distinctive flavor profile. But here’s the good news: it’s actually quite simple and fun to make! Plus, I’ve got some handy tips that I’ve picked up along the way to help you nail it.
Let’s dive right into the ingredients that will transform ordinary moments into delightful celebrations. You’ll need 2 ½ cups of all-purpose flour, 1 ½ cups of sugar, a teaspoon each of baking powder and baking soda, and a pinch of salt. For the wet ingredients, gather 1 cup of vegetable oil, 1 cup of buttermilk (make sure it’s at room temperature), 2 large eggs (also at room temperature), and 2 tablespoons of red food coloring. Don’t forget a teaspoon of vanilla extract and another teaspoon of white vinegar to kick things off! And, of course, what would a red velvet cake be without a generous slathering of cream cheese frosting?
The setup is crucial. Start by preheating your oven to 350°F (that’s 175°C for my friends across the pond). While that’s warming up, grease and flour three 9-inch round cake pans. It’s a small step, but it makes all the difference in ensuring the cakes come out cleanly without sticking.
In a large bowl, mix together the dry ingredients: the flour, sugar, baking powder, baking soda, and salt. As you whisk, you’ll feel the blend of textures coming together. In a separate bowl, combine the oil, buttermilk, eggs, food coloring, vanilla, and vinegar. You really want to whisk these until everything is beautifully combined. The vibrant red will start to impress you even at this stage!
Now, you’re going to merge these two mixtures. Gradually fold the wet ingredients into the dry ones. It’s tempting to beat the batter vigorously, but don’t! Gently mix until just combined, and let that red hue shine without overworking the batter.
Next comes the most rewarding part—dividing the batter evenly among your prepared pans. Bake those beauties for 25 to 30 minutes. I recommend starting to check them at about 25 minutes by inserting a toothpick into the center; if it comes out clean, they’re ready to cool. When the time’s up, let them cool in the pans for a solid 10 minutes before turning them out onto wire racks.
As the cakes cool, this is the perfect window to whip up your cream cheese frosting. I typically use a basic cream cheese frosting recipe that balances sweetness with a tangy kick, which pairs perfectly with the cake’s rich flavors.
You might be wondering, what’s the trick to get this cake just right? I’ve found that using room temperature ingredients is key—they blend more seamlessly and contribute to a wonderfully moist texture. Also, make sure to not skimp on the food coloring. The right amount not only gives that aesthetic appeal but also enhances the flavor profile.
Once your cakes have cooled completely, layer and frost them with your cream cheese frosting. Generously coat the top and sides, and don’t worry too much about perfection; a little rustic charm can add personality! The contrast between the red layers and the ivory frosting is simply stunning and definitely worth a few “oohs” and “aahs” when you bring it to the table.
I often serve my red velvet cake at special occasions and family gatherings, where it never fails to be met with smiles and full plates. It’s paired beautifully with a lovely cup of coffee or tea; the decadent layers complement each sip perfectly! And if by some chance there are leftovers, which is rare, I recommend storing slices in an airtight container in the fridge. The cake keeps surprisingly well for several days, maybe even tasting a little better as the flavors meld.
Feeling adventurous? You can play with variations of this classic cake. For a fun twist, try making red velvet cake truffles by crumbling the cooled layers into a cake pop consistency, rolling them into bite-sized pieces, and dipping them in chocolate. Or go the brownie route with red velvet brownies that have that same velvety goodness in a fudgy form. The possibilities are endless!
So there you have it—my beloved red velvet cake recipe, filled with memories and a few tricks of the trade. There’s nothing quite like the joy of sharing this delicious cake with loved ones. It brings people together, creating moments worth cherishing long after the cake is gone.
Conclusion
Making a red velvet cake is more than just baking; it’s about creating experiences and memories. If you want a detailed guide that aligns closely with this recipe, you can check out this fantastic rendition of a red velvet cake with cream cheese frosting from Sally’s Baking, which offers a wonderful walkthrough. Now grab your ingredients and start baking! Your taste buds—and your friends—will thank you.
Red Velvet Cake
Ingredients
Method
- Preheat your oven to 350°F (175°C). Grease and flour three 9-inch round cake pans.
- In a large bowl, mix together the dry ingredients: flour, sugar, baking powder, baking soda, and salt.
- In a separate bowl, combine the oil, buttermilk, eggs, food coloring, vanilla, and vinegar. Whisk until combined.
- Gradually fold the wet mixture into the dry mixture until just combined.
- Divide the batter evenly among the prepared pans.
- Bake for 25 to 30 minutes. Check for doneness by inserting a toothpick; it should come out clean.
- Let the cakes cool in the pans for 10 minutes before turning them out onto wire racks.
- Prepare the cream cheese frosting while the cakes cool.
- Once the cakes are completely cooled, layer and frost them with the cream cheese frosting. Coat the top and sides generously.